Flanken short ribs are a cut that gets overlooked far too often, yet they deliver incredible flavor and tenderness when cooked right. These thin, cross-cut ribs come from the plate section and cook faster than traditional short ribs while staying incredibly juicy.
If you love beef that falls apart at the touch of a fork and want a showstopper dinner that tastes like it took all day, you’re about to discover your new go-to recipe. Let me walk you through how to make flanken short ribs that will have everyone asking for seconds.
Why You’ll Love This Recipe
Flanken short ribs deliver restaurant-quality flavor in under two hours, which beats most braised beef dishes by a mile. The thin cut means maximum surface area for browning, creating a crust that locks in moisture and develops serious depth.
- Cooks in 90 minutes instead of the 4-5 hours traditional short ribs demand
- The bones add collagen that creates a naturally rich, silky sauce
- Works beautifully for weeknight dinners or impressing dinner guests
- Freezes exceptionally well for meal prep
- One pot means minimal cleanup after a satisfying meal
My Experience Making This Recipe
The first time I made flanken short ribs, I was skeptical about the thin cut. I thought they’d cook too fast and dry out, but I was completely wrong.
The moment those ribs hit the hot Dutch oven, the kitchen filled with this deep, caramelized beef aroma that made my mouth water. The sear created this beautiful mahogany crust that promised flavor underneath.
When I pulled the lid off after braising, the meat was so tender that my spoon went straight through. My family devoured them in minutes, and I’ve made this recipe at least a dozen times since.
Recipe Overview
- Recipe Name: Flanken Short Ribs
- Servings: 4 to 6
- Prep Time: 15 minutes
- Cook Time: 90 minutes
- Total Time: 105 minutes
- Course: Main Course
- Cuisine: American
- Calories per Serving: 520
Equipment You Will Need
- Dutch oven or heavy-bottomed braising pot with lid
- Sharp chef’s knife
- Cutting board
- Paper towels
- Tongs or long-handled fork
- Measuring spoons and cups
- Small bowl for mixing spices
- Meat thermometer (optional but helpful)
Ingredients for Flanken Short Ribs
- 3 pounds flanken short ribs, cut about 1 inch thick
- 2 teaspoons kosher salt
- 1 teaspoon black pepper
- 1 teaspoon garlic powder
- 1 teaspoon onion powder
- 2 tablespoons olive oil
- 1 large yellow onion, sliced into thick rings
- 4 cloves garlic, smashed
- 2 cups beef broth
- 1 cup red wine (optional but recommended)
- 2 tablespoons tomato paste
- 2 bay leaves
- 1 tablespoon fresh thyme leaves
- 1 tablespoon Worcestershire sauce
- 2 carrots, cut into 2-inch pieces
- 1 pound baby potatoes, halved
Ingredient Notes and Substitutions
- Flanken short ribs: This cut comes from the plate and includes multiple rib bones in a thin slice, creating maximum surface area for searing. You can substitute bone-in beef chuck if flanken isn’t available, though cooking time may extend to 2.5 hours.
- Beef broth: A quality broth creates the foundation of your braising liquid and adds savory depth. Chicken broth works in a pinch but delivers less richness.
- Red wine: Wine adds acidity and tannins that brighten the sauce and balance richness. Substitute with an extra cup of broth if you prefer alcohol-free cooking.
- Tomato paste: This ingredient adds umami and slight sweetness that rounds out the sauce. If you don’t have it, skip it or use a tablespoon of ketchup instead.
- Fresh thyme: Thyme provides an earthy note that complements beef beautifully. Dried thyme works but use only one teaspoon since dried herbs are more concentrated.
How to Make Flanken Short Ribs
Step 1: Prepare and Season the Ribs
Pat your flanken short ribs completely dry with paper towels, removing any surface moisture. This step matters because wet meat steams instead of sears, and you want that golden crust that builds flavor.
Combine your salt, pepper, garlic powder, and onion powder in a small bowl, then season both sides of each rib generously. Let the ribs sit at room temperature for about 10 minutes while you prep your vegetables.
Step 2: Heat Your Pot and Get It Smoking Hot
Pour olive oil into your Dutch oven and set the heat to medium-high, giving the oil about 2 minutes to get properly hot. You’ll know it’s ready when the oil shimmers and looks like it’s barely smoking.
A properly heated pot is critical because it creates that beautiful caramelized crust through the Maillard reaction, which is where all the flavor comes from. Rush this step and you’ll end up with gray, steamed meat instead.
Step 3: Sear the Ribs in Batches
Working in batches so you don’t overcrowd the pot, lay the ribs flat in the hot oil and let them sear undisturbed for 3 to 4 minutes on the first side. Don’t move them around; that constant poking prevents browning.
Flip each rib carefully and sear the other side for another 3 to 4 minutes until deep golden brown. Transfer the seared ribs to a plate while you continue with batches.
Step 4: Build Your Flavor Base with Onions and Garlic
In the same pot with the drippings still clinging to the bottom, add your sliced onions and let them cook for about 3 minutes, stirring occasionally. The onions will start picking up all those flavorful browned bits, a process called deglazing.
Add your smashed garlic cloves and cook for another minute until fragrant, then stir in your tomato paste and cook for one more minute. This layering of aromatics builds complexity that tastes like you’ve been cooking all afternoon.
Step 5: Deglaze the Pot with Wine
Pour in your red wine, scraping the bottom of the pot with a wooden spoon to release all those stuck-on browned bits. These browned bits, called fond, contain concentrated beef flavor that will become part of your sauce.
Let the wine bubble away for about 2 minutes so some of the alcohol cooks off and the sharp flavor mellows slightly. If you skip the wine, simply pour in an extra cup of broth instead.
Step 6: Add Broth and Seasonings, Then Return the Ribs
Pour in your beef broth, add the bay leaves, fresh thyme, and Worcestershire sauce, then stir everything together. Return all the seared ribs to the pot, nestling them into the liquid so they’re mostly submerged.
The liquid should come about three-quarters of the way up the sides of the ribs. If you need more liquid, add a splash of water or broth.
Step 7: Braise Low and Slow in the Oven
Cover the Dutch oven with its lid and transfer it to a 325-degree oven. Braise for 45 minutes, then add your carrots and potatoes, nestling them around the ribs.
Return the pot to the oven uncovered for another 40 to 45 minutes until the meat is fork-tender and the vegetables are cooked through. The lower oven temperature keeps the ribs from toughening while the long cooking breaks down connective tissue.
Step 8: Check Doneness and Rest
Pierce the thickest part of a rib with a knife or fork; it should slide through with almost no resistance. If it still feels firm, cover the pot and return it to the oven for another 10 minutes.
Once the ribs are tender, remove the pot from the oven and let it rest uncovered for 5 minutes. This short rest allows the meat fibers to relax, making each bite even more tender.
Pro Tip: Don’t skip the searing step, even though it adds 15 minutes to your cooking time; the crust creates deep, caramelized flavors that braise-only methods simply cannot achieve.
Tips for the Best Flanken Short Ribs
- Buy flanken from a butcher counter if possible, as the thickness matters enormously for even cooking. Pre-packaged ribs can vary wildly in thickness.
- Pat the meat thoroughly dry before seasoning; any surface moisture interferes with browning and creates steam instead of a crust.
- Don’t crowd the pot when searing; give each rib plenty of space and sear in multiple batches if needed for better browning.
- Use fresh herbs when possible; they add brighter flavor than dried herbs, particularly the thyme in this recipe.
- Skim excess fat from the surface of the braising liquid before serving if you prefer a lighter sauce, though the fat carries tremendous flavor.
- Taste the finished sauce and season with salt and pepper as needed; braising liquid benefits from final seasoning adjustments.
Common Mistakes to Avoid
- Skipping the sear on the ribs means missing out on the deep, caramelized flavors that make this dish special; gray, steamed meat cannot recreate this complexity.
- Overcrowding the pot during searing prevents browning and creates steam, resulting in meat that tastes boiled rather than seared.
- Cooking at too high a temperature in the oven can toughen the meat and cause it to shrink excessively; stick to 325 degrees.
- Moving the ribs constantly while braising prevents them from properly caramelizing and absorbing sauce flavors, so resist the urge to stir.
- Skipping the rest period after braising means the meat stays tense and releases all its juices onto the plate instead of staying in the meat.
Serving Suggestions
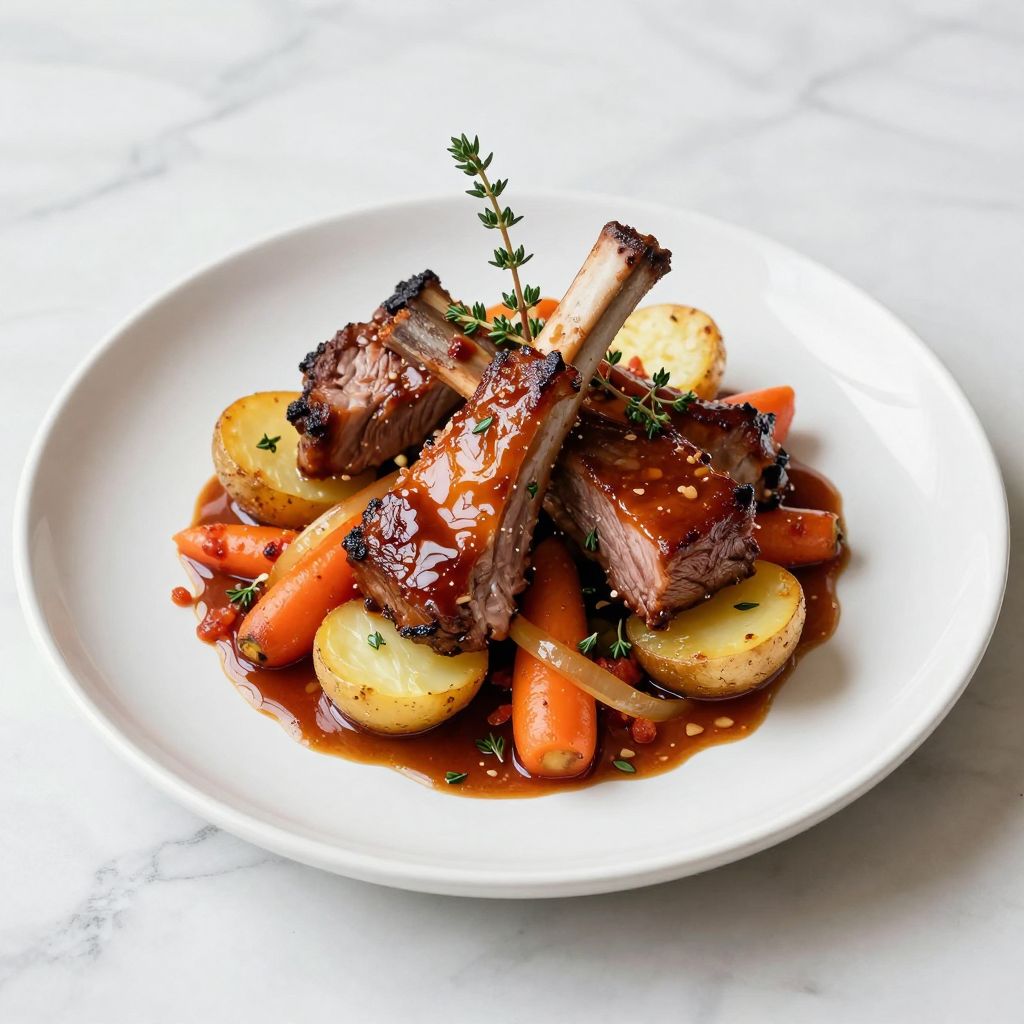
Flanken short ribs shine when served in their rich braising liquid, which has become a luxurious sauce through hours of simmering. The vegetables cooked alongside the ribs are tender enough to serve straight from the pot.
- Creamy mashed potatoes soaked in extra sauce from the pot
- Crusty bread for soaking up every drop of braising liquid
- Creamed spinach or sauteed green beans for a lighter vegetable contrast
- Egg noodles tossed with butter and parsley to catch all the sauce
- A simple green salad with vinaigrette to balance the richness of the beef
Variations to Try
- Asian-Inspired: Replace the wine and Worcestershire with soy sauce, rice vinegar, and ginger, then add star anise and a cinnamon stick for warmth and sweetness.
- Coffee-Braised: Add 2 tablespoons of strong brewed coffee and 1 tablespoon of cocoa powder to deepen the beef flavor without tasting like coffee.
- Root Vegetable Version: Substitute the potatoes and carrots with parsnips, celery root, and Brussels sprouts for earthier, more complex flavors.
- Red Wine Reduction: Skip the vegetables and finish by reducing the braising liquid on the stovetop until syrupy, creating a glossy sauce that clings to the meat.
- Spicy Korean-Style: Add gochugaru red pepper flakes, soy sauce, sesame oil, and minced garlic for a bold, spicy version inspired by Korean braised beef.
Dietary Adaptations
- Gluten-Free: Verify that your Worcestershire sauce is gluten-free, as many brands contain barley; all other ingredients are naturally gluten-free.
- Dairy-Free: This recipe is already dairy-free, though serving alongside mashed potatoes would require using dairy-free butter and milk as substitutes.
- Low-Carb or Keto: Skip the potatoes entirely and bulk up with more carrots and cauliflower for fewer carbs while maintaining the braising liquid’s richness.
- Vegetarian: This recipe cannot be easily adapted to vegetarian since the ribs are the star, though you could create a similar braise using mushroom steaks and hearty root vegetables.
Storage and Reheating
Refrigerator
Let the ribs cool to room temperature, then transfer them to an airtight container with plenty of braising liquid. They’ll keep for up to 4 days.
- The flavors actually improve after a day in the fridge as they continue to meld
- Skim any solidified fat from the top before reheating if you prefer
Freezer
Freeze the cooled ribs in their braising liquid in freezer-safe containers for up to 3 months. The liquid prevents the meat from drying out.
- Thaw overnight in the refrigerator before reheating
- Keep the ribs submerged in liquid while freezing to maintain moisture
Reheating
Transfer the ribs and liquid to a Dutch oven, cover, and warm in a 325-degree oven for 20 to 25 minutes until heated through. Alternatively, reheat gently on the stovetop over medium-low heat.
- Add a splash of water or broth if the liquid has reduced too much
- Never microwave, as direct heat can toughen the meat
Nutrition Information
| Nutrient | Amount |
|---|---|
| Calories | 520 |
| Total Fat | 28g |
| Saturated Fat | 11g |
| Carbohydrates | 16g |
| Fiber | 2g |
| Sugar | 4g |
| Protein | 52g |
| Sodium | 680mg |
| Cholesterol | 115mg |
These values are approximate and based on standard ingredient sizes and usda data. Actual nutrition varies depending on specific brands and how the dish is prepared.
Frequently Asked Questions
Can I make flanken short ribs in a slow cooker?
Absolutely, sear the ribs in a pot first, then transfer them and all ingredients to a slow cooker set on low for 6 hours. You’ll lose the advantage of speed, but the results are equally tender.
What if I can’t find flanken short ribs at my store?
Ask your butcher to cut flanken from the plate section, or substitute with chuck roast or bone-in beef chuck, though these will need 2.5 to 3 hours of braising. Regular short ribs also work but require 3 to 4 hours instead.
Can I make this recipe ahead of time?
Yes, this dish actually tastes better after sitting overnight in the refrigerator as flavors meld and deepen. Simply reheat gently in a 325-degree oven for 20 to 25 minutes.
Why is my sauce too thin or too thick?
If too thin after braising, uncover the pot and simmer on the stovetop over medium heat until it reduces to your desired consistency. If too thick, whisk in more broth or water a little at a time.
Should the ribs be covered or uncovered while braising?
Cover the pot for the first 45 minutes to trap steam and speed cooking, then add vegetables and braise uncovered for the remaining time so the sauce can concentrate slightly. This balance prevents drying while developing sauce flavor.
Final Thoughts
Flanken short ribs deserve a permanent spot in your weeknight dinner rotation because they deliver restaurant-quality results without taking all afternoon. The combination of crispy exterior, tender meat, and silky sauce keeps people coming back for more.
Give this recipe a try and you’ll discover why flanken is my go-to cut for impressing people without the stress. Your kitchen will smell incredible, and your family will be asking when you’re making them again.
Flanken Short Ribs
Ingredients
Equipment
Method
- Pat the flanken short ribs completely dry with paper towels to remove any surface moisture.
- In a small bowl, combine kosher salt, black pepper, garlic powder, and onion powder.
- Season both sides of each rib generously with the spice mixture, then let rest at room temperature for about 10 minutes.
- Heat olive oil in a Dutch oven over medium-high heat until shimmering and just starting to smoke, about 2 minutes.
- Sear the ribs in batches without overcrowding the pot, laying them flat and cooking undisturbed for 3 to 4 minutes on the first side until deep golden brown.
- Flip each rib and sear the other side for another 3 to 4 minutes. Transfer seared ribs to a plate and repeat until all ribs are browned.
- In the same pot with drippings, add sliced onions and cook for about 3 minutes, stirring occasionally, to deglaze and soften.
- Add smashed garlic cloves and cook for 1 minute until fragrant.
- Stir in tomato paste and cook for an additional minute to build flavor.
- Pour in red wine and scrape the bottom of the pot with a wooden spoon to release browned bits. Let the wine bubble and reduce for about 2 minutes.
- Add beef broth, bay leaves, fresh thyme leaves, and Worcestershire sauce. Stir to combine.
- Return the seared ribs to the pot, nestling them into the liquid so they are mostly submerged. Add a splash of broth or water if needed.
- Cover the pot with a lid and braise in a preheated 325°F (163°C) oven for 45 minutes.
- Remove the lid, add carrots and halved baby potatoes around the ribs, and return the pot to the oven uncovered.
- Continue braising uncovered for another 40 to 45 minutes until the meat is fork-tender and the vegetables are cooked through.
- Check doneness by piercing the thickest part of a rib with a knife or fork; it should slide through with almost no resistance. If not tender, cover and braise for 10 additional minutes.
- Once tender, remove the pot from the oven and let rest uncovered for 5 minutes before serving.