Deviled Eggs with Relish are the ultimate party appetizer that never fails to impress, and they come together in less than 20 minutes. This twist on the classic combines creamy egg yolks with tangy pickle relish for a flavor punch that keeps guests reaching for more.
Whether you’re hosting a potluck, preparing a holiday spread, or just craving a nostalgic snack, these eggs deliver on taste and ease. Let me walk you through everything you need to know to make them perfectly every single time.
Why You’ll Love This Recipe
This recipe hits all the marks for a crowd-pleasing appetizer that takes minimal effort but looks impressive on the plate.
- Ready in under 20 minutes with just 8 ingredients
- The relish adds a sweet and tangy kick that elevates the standard deviled egg
- Can be made ahead and chilled for convenient entertaining
- Budget-friendly and uses pantry staples most home cooks already have
- Naturally gluten-free and easy to customize for dietary needs
My Experience Making This Recipe
I discovered the magic of relish in deviled eggs at a neighborhood potluck years ago, and honestly, I’ve never gone back to the plain version. The first bite hit me with that unexpected sweetness from the relish, which perfectly balanced the richness of the yolk and the slight vinegar tang.
My family devoured them so quickly that I started making double batches for gatherings. Friends always ask for the recipe, shocked that something this delicious comes from such simple components.
The relish trick transforms an old favorite into something that feels fresh and special without requiring any fancy skills. Every time I serve these, at least one person says “These are the best deviled eggs I’ve ever had,” and that never gets old.
Recipe Overview
- Recipe Name: Deviled Eggs with Relish
- Servings: 12 deviled egg halves (6 eggs)
- Prep Time: 15 minutes
- Cook Time: 12 minutes
- Total Time: 27 minutes
- Course: Appetizer
- Cuisine: American
- Calories per Serving: 95
Equipment You Will Need
- Large pot for boiling
- Ice bath bowl or large bowl with ice water
- Cutting board
- Knife
- Spoon for scooping yolks
- Small mixing bowl
- Fork for mashing
- Small piping bag or zip-top bag with corner snipped
- Serving platter
Ingredients for Deviled Eggs with Relish
- 6 large eggs
- 3 tablespoons mayonnaise
- 2 tablespoons sweet pickle relish
- 1 teaspoon yellow mustard
- 1/2 teaspoon apple cider vinegar
- 1/4 teaspoon salt
- 1/8 teaspoon black pepper
- Paprika for garnish
Ingredient Notes and Substitutions
- Eggs: Large eggs provide the right ratio of white to yolk. If you only have medium eggs, reduce the mayo slightly so the filling isn’t runny.
- Mayonnaise: This creates the creamy base and binds everything together. Greek yogurt works as a substitute but will make the filling slightly thinner and tangier in flavor.
- Sweet pickle relish: The relish adds sweetness, tang, and texture that make these eggs special. Dill relish gives a savory herb kick, while hot dog relish brings a different sweetness profile.
- Yellow mustard: A small amount adds depth without overpowering the other flavors. Dijon mustard creates a more sophisticated taste but use only half the amount since it’s stronger.
- Apple cider vinegar: This brightens the filling and balances richness. White vinegar or lemon juice both work fine, though they’ll taste slightly different.
How to Make Deviled Eggs with Relish
Step 1: Boil the Eggs
Place 6 large eggs in a pot and cover them with cold water by about an inch. Boiling eggs in cold water helps them cook evenly and makes peeling easier later on.
Bring the water to a rolling boil over high heat, then remove from heat and let the eggs sit covered for 12 minutes. This method gives you perfectly cooked eggs with creamy yolks every single time.
Step 2: Shock the Eggs in Ice Water
Transfer the cooked eggs immediately to an ice bath (a bowl filled with ice and cold water) to stop the cooking process. Shocking the eggs prevents that ugly gray ring from forming around the yolk and makes them much easier to peel.
Let them sit in the ice bath for at least 3 minutes before you start peeling. The cold also helps the shell separate from the white more cleanly.
Step 3: Peel the Eggs
Gently tap and roll each cooled egg on the counter to crack the shell all over, then peel under cool running water. Starting from the wider end where the air pocket is makes peeling smoother and less frustrating.
Pat the peeled eggs dry with a paper towel to remove excess moisture. Dry eggs prevent the filling from becoming watery.
Step 4: Halve the Eggs
Using a sharp knife, carefully cut each egg in half lengthwise, creating two even halves. A steady hand and a gentle sawing motion work better than trying to hack through in one motion.
Arrange the halves on your work surface with the yolk side facing up. This setup makes it easy to scoop out the yolks without damaging the delicate whites.
Step 5: Scoop Out the Yolks
Use a small spoon to carefully scoop the yolk out of each egg white half, placing the yolks in a small mixing bowl. Be gentle to avoid cracking the whites, which are fragile and collapse easily if you press too hard.
Once all yolks are removed, you should have 12 white halves and 6 whole yolks ready to transform. The whites are now your blank canvas for the creamy filling.
Step 6: Make the Filling
Add the 3 tablespoons of mayonnaise, 2 tablespoons of sweet pickle relish, 1 teaspoon of yellow mustard, and 1/2 teaspoon of apple cider vinegar to the bowl with the yolks. The relish adds both flavor and texture while the vinegar brightens everything.
Using a fork, mash the yolks and fold everything together until you reach a smooth, creamy consistency. A few small chunks of relish are fine, but you want mostly uniformity so the filling pipes evenly.
Step 7: Season to Taste
Stir in the 1/4 teaspoon of salt and 1/8 teaspoon of black pepper, then taste a tiny bit of the filling. Seasoning at the end lets you adjust to your preference without oversalting earlier.
If it feels too thick, add mayo a teaspoon at a time. If it’s too soft, a pinch more salt and pepper helps firm it up slightly.
Step 8: Pipe the Filling
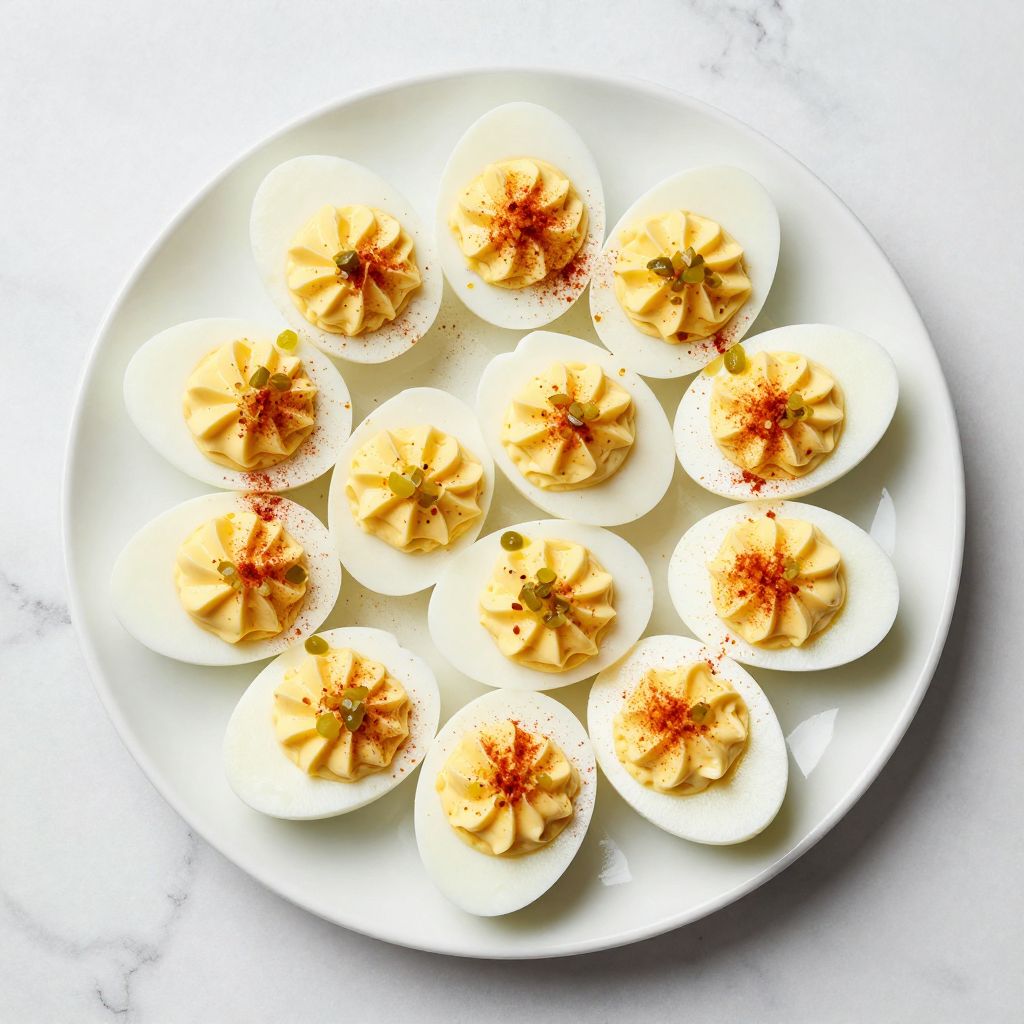
Transfer the filling to a piping bag fitted with a large star tip, or use the simple hack of snipping a corner off a zip-top bag. Piping creates those elegant ridges that make deviled eggs look fancy and impressive.
Pipe a generous dollop of filling into each egg white half, using even pressure to create consistent peaks. If you don’t have a piping bag, a simple spoon works fine for a more rustic look.
Step 9: Garnish and Chill
Dust the top of each deviled egg with a pinch of paprika for color and a subtle warm spice note. A tiny pinch of additional relish on top adds both visual appeal and a flavor reminder.
Refrigerate the finished eggs for at least 30 minutes before serving, or up to 4 hours ahead. Chilling allows the flavors to meld and keeps the eggs at the perfect temperature for serving.
Pro Tip: Boil your eggs the day before and peel them in advance if you’re short on time. Store the peeled eggs in an airtight container in the refrigerator, then make the filling and assemble them just before your gathering.
Tips for the Best Deviled Eggs with Relish
- Use the freshest eggs you can find since older eggs peel more easily. Fresh eggs are trickier to peel, so if you’re planning deviled eggs, buy eggs at least a week ahead.
- Don’t skip the ice bath after boiling. This single step prevents that unattractive gray ring and makes peeling so much smoother.
- Keep your ingredients at room temperature before mixing so the filling comes together smoothly and evenly. Cold mayo can be lumpy and hard to fold in.
- Make the filling just before serving to prevent the relish from releasing extra liquid that makes the filling runny. If you must make it ahead, drain the relish briefly on a paper towel first.
- Use a piping bag for a restaurant-quality presentation that looks way more impressive than you might expect. Even a small star tip transforms simple spoon placement into something special.
Common Mistakes to Avoid
- Overcooking the eggs makes the yolk turn gray and rubbery, and the filling tastes less bright and fresh. Stick to the 12-minute timing after removing from heat for perfect creamy yolks.
- Skipping the ice bath makes eggs nearly impossible to peel cleanly and creates that unappetizing gray ring. Cold water instantly stops the cooking and saves you frustration.
- Using too much relish turns the filling watery and makes it hard to pipe neatly. Two tablespoons is the sweet spot for flavor without overdoing the moisture.
- Forgetting to season adequately leaves the filling tasting flat and one-note. Take a second to taste and adjust salt and pepper before piping.
- Making the filling too far ahead causes the relish juice to leak into the mayo, creating a soupy filling that won’t hold its shape. Assemble within an hour of serving for best results.
Serving Suggestions
Deviled eggs with relish shine as an appetizer on their own, but they pair beautifully with almost any gathering spread. Serve them chilled straight from the fridge for the best texture and flavor.
- At a potluck or picnic alongside fried chicken and potato salad for a classic comfort food spread
- As part of a charcuterie board with cured meats, cheeses, and crackers for a sophisticated appetizer mix
- On a holiday table next to ham, rolls, and casseroles for a traditional celebration addition
- At a cocktail party with other finger foods like sliders, shrimp, and crostini
- As a protein-packed snack for lunch boxes or quick meals throughout the week
Variations to Try
- Dill and Caper Version: Replace sweet relish with dill relish and add 1 teaspoon of capers for a briny, herbaceous kick that feels more upscale.
- Bacon and Chive: Mix in 2 tablespoons of crumbled bacon and 1 tablespoon of fresh chives for a smoky, oniony depth that feels restaurant-quality.
- Sriracha Heat: Add 1/2 teaspoon of sriracha sauce to the filling and top with a thin layer of sriracha mayo for those who love spicy appetizers.
- Smoked Paprika and Cumin: Replace regular paprika with smoked paprika in the filling and add 1/4 teaspoon of cumin for a warm, smoky flavor profile.
- Lemon and Herb: Use lemon juice instead of apple cider vinegar and add 1 teaspoon of fresh dill or tarragon for a bright, garden-fresh taste.
Dietary Adaptations
- Gluten-Free: This recipe is naturally gluten-free since all ingredients are naturally free from gluten. Always verify that your relish and mustard brands are certified gluten-free if serving to those with celiac disease.
- Dairy-Free: Replace mayonnaise with dairy-free mayo in equal amount and the recipe stays completely dairy-free with zero flavor sacrifice. The filling comes together just as smoothly and creamily.
- Vegan: Use aquafaba (chickpea liquid) whisked with oil to create a vegan mayo, or buy vegan mayo, and the eggs become plant-based. The trade-off is slightly less richness, but the relish keeps it flavorful and fun.
- Low-Carb and Keto: This recipe is naturally very low in carbs with just a gram or two per serving from the relish and mustard. It’s perfect as-is for keto diets without any modifications needed.
Storage and Reheating
Refrigerator
Store assembled deviled eggs in an airtight container on a flat surface in the coldest part of your refrigerator. They keep fresh for up to 4 days, though they taste best within 2 days before the filling starts to separate slightly.
- Keep the container sealed to prevent the eggs from absorbing odors from other foods
- Store egg whites and filling separately if making more than 2 hours ahead to prevent sogginess
Freezer
Deviled eggs don’t freeze well because the mayo-based filling separates when thawed, creating a watery, grainy texture. It’s better to store the cooked egg whites and filling separately in the freezer, then assemble fresh when needed.
- Freeze plain cooked egg white halves in an airtight container for up to 3 months
- Freeze the filling in a separate container for up to 2 months, then thaw and re-mix before piping
Reheating
Deviled eggs are best served cold or at room temperature, so reheating isn’t recommended as it changes the texture. Simply remove them from the refrigerator 10 minutes before serving to bring them to ideal temperature.
- Let chilled eggs sit at room temperature for a more creamy, soft texture
- Refresh the filling by piping a tiny dollop of fresh mayo on top if eggs have been refrigerated for more than 24 hours
Nutrition Information
| Nutrient | Amount |
|---|---|
| Calories | 95 |
| Total Fat | 8g |
| Saturated Fat | 1.5g |
| Carbohydrates | 2g |
| Fiber | 0g |
| Sugar | 1g |
| Protein | 6g |
| Sodium | 180mg |
| Cholesterol | 140mg |
Nutritional values are estimates based on standard ingredients and may vary depending on specific brands used. Homemade versions tend to be higher in protein and lower in sodium than store-bought versions.
Frequently Asked Questions
Can I make these eggs a day ahead?
Yes, you can boil and peel the eggs up to 2 days ahead and store them in the refrigerator in an airtight container. Make the filling and assemble the eggs up to 4 hours before serving for the best texture and flavor.
What if my eggs are hard to peel?
Your eggs were probably too fresh, meaning they were laid within a few days of cooking. Buy eggs at least a week before you plan to use them, and always shock them immediately in ice water after boiling.
Can I use a different type of relish?
Absolutely, relish swaps are one of the fun parts of this recipe. Dill relish, hot dog relish, and even hamburger relish all work great and change the flavor profile in interesting ways.
Why is my filling too runny?
The relish likely released too much liquid, or you added too much mayo relative to yolks. Drain sweet relish briefly on a paper towel before mixing, and stick to the 3 tablespoons of mayo for 6 yolks.
Can I make this recipe without mayonnaise?
Greek yogurt, sour cream, or dairy-free mayo all work as mayo substitutes in equal amounts. The flavor and texture shift slightly, but the eggs remain delicious and creamy with these swaps.
How do I know when eggs are done boiling?
After 12 minutes of sitting in the covered pot off heat, crack one egg open and look at the yolk. It should be fully set but still pale yellow with no gray ring, indicating perfectly cooked eggs.
Final Thoughts
Deviled eggs with relish are proof that simple ingredients create the best dishes when you treat them right. The relish twist transforms a standard appetizer into something your guests will actually remember and ask about.
Next time you need an appetizer that impresses without stress, reach for eggs and relish. Trust me, this recipe will become a go-to favorite that you make again and again.
Deviled Eggs with Relish
Ingredients
Equipment
Method
- Place 6 large eggs in a pot and cover them with cold water by about an inch.
- Bring the water to a rolling boil over high heat, then remove from heat and let the eggs sit covered for 12 minutes.
- Transfer the cooked eggs immediately to an ice bath to stop the cooking process and let them sit for at least 3 minutes.
- Gently tap and roll each cooled egg on the counter to crack the shell, then peel under cool running water.
- Pat the peeled eggs dry with a paper towel.
- Using a sharp knife, cut each egg in half lengthwise, creating two even halves.
- Arrange the halves on a work surface with the yolk side facing up.
- Use a small spoon to scoop out the yolks from each egg white half, placing the yolks in a small mixing bowl.
- Add 3 tablespoons mayonnaise, 2 tablespoons sweet pickle relish, 1 teaspoon yellow mustard, and 1/2 teaspoon apple cider vinegar to the yolks.
- Mash the yolks and fold everything together with a fork until smooth and creamy, leaving a few small chunks of relish.
- Stir in 1/4 teaspoon salt and 1/8 teaspoon black pepper, then taste and adjust seasoning if needed.
- Transfer the filling to a piping bag fitted with a large star tip or use a zip-top bag with a corner snipped.
- Pipe a generous dollop of filling into each egg white half using even pressure to create consistent peaks.
- Dust the top of each deviled egg with a pinch of paprika and optionally a tiny pinch of additional relish.
- Refrigerate the finished eggs for at least 30 minutes before serving or up to 4 hours ahead.