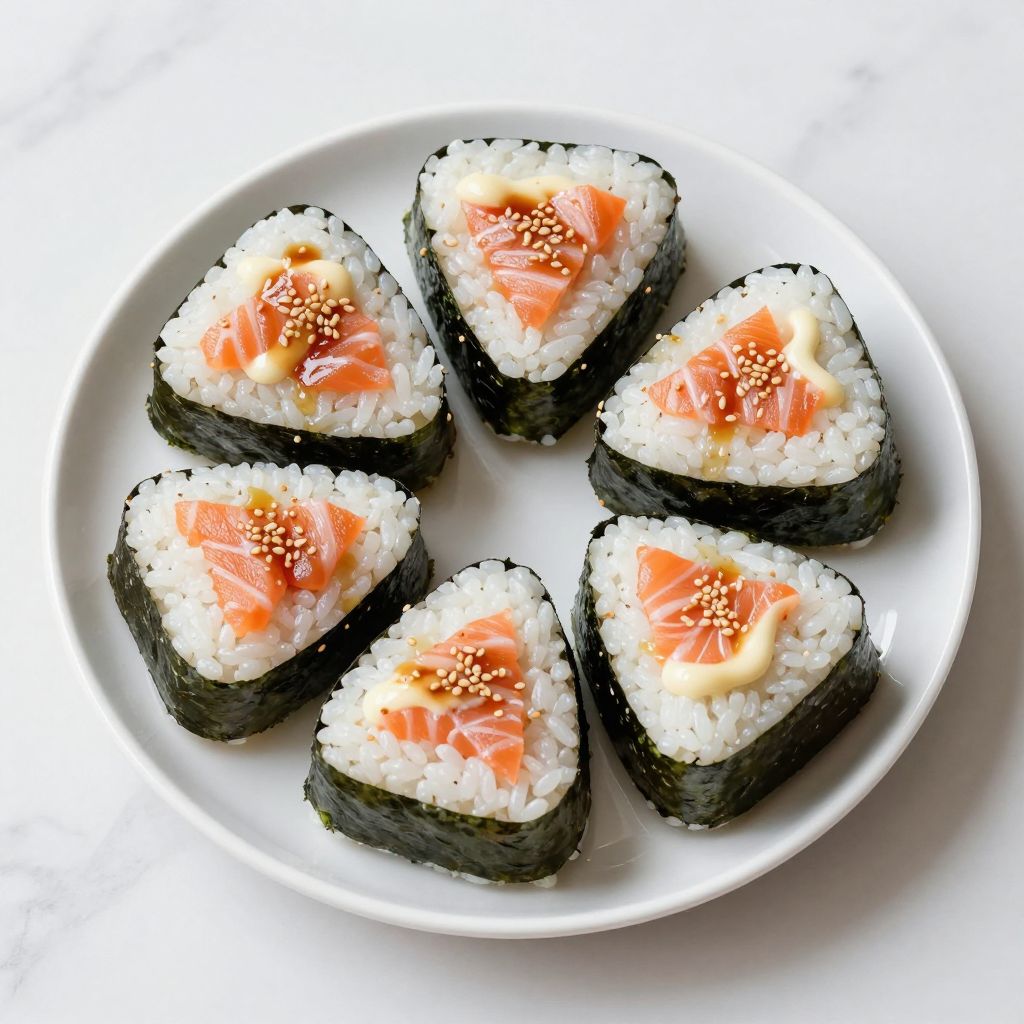
Salmon onigiri are Japanese rice balls filled with flaked salmon, and they’re the ultimate portable lunch or snack that tastes far better than any sad sandwich in your desk drawer. These little triangles pack savory umami flavor, require no special skills, and come together in about 20 minutes flat. Whether you’re meal-prepping for the week or need something quick for a picnic, this recipe delivers restaurant-quality results at home.
Why You’ll Love This Recipe
Salmon onigiri hit every mark: they’re simple, satisfying, and genuinely fun to make.
- No cooking required for the salmon if you use canned or pre-cooked varieties, cutting prep time significantly.
- Naturally portable and mess-free, making them ideal for lunch boxes, travel, or meal prep.
- The combination of fluffy rice, salty salmon, and crispy nori wrapping creates an addictive texture contrast.
- Customizable with your choice of fillings and seasonings to match your taste preferences.
- Budget-friendly and uses minimal ingredients, keeping your grocery bill low.
My Experience Making This Recipe
I first learned to make onigiri from a Japanese friend who handed me a rice ball without warning and said, “Now you try.” I was terrified I’d mess it up, but the moment I shaped that first triangle, I was hooked. The tactile joy of molding warm rice in your palms is genuinely meditative.
The salmon version became my go-to because canned salmon sits in my pantry year-round, and it takes the guesswork out of cooking fish perfectly. My kids devour them faster than I can make them, which tells you everything about their appeal. Even my pickiest eater requests these over store-bought snacks.
Recipe Overview
- Recipe Name: Salmon Onigiri
- Servings: 6 onigiri (serves 2-3 as a main, 3-4 as a snack)
- Prep Time: 15 minutes
- Cook Time: 0 minutes (if using pre-cooked salmon)
- Total Time: 15 minutes
- Course: Lunch, Snack, Appetizer
- Cuisine: Japanese
- Calories per Serving: 180 calories
Equipment You Will Need
- Medium mixing bowl
- Small bowl for water (to wet your hands)
- Fork or chopsticks for mixing
- Measuring cups and spoons
- Nori sheets (seaweed), optional but recommended
- Kitchen shears or a knife to cut nori into strips
- Paper towels or clean kitchen cloth
- Small plate or cutting board for assembly
Ingredients for Salmon Onigiri
For the Rice Balls
- 2 cups cooked sushi rice (or short-grain white rice), cooled to room temperature
- 1 can (5 ounces) salmon, drained and flaked, or 1 cup cooked fresh salmon
- 1 teaspoon salt, divided
- 1 tablespoon mayonnaise, optional but adds richness
- 1/2 teaspoon soy sauce
- 1/4 teaspoon wasabi, optional for a subtle kick
- Nori sheets, cut into 6 strips, one per onigiri
- Water for wetting your hands
Optional Flavor Additions
- 1 tablespoon sesame seeds, toasted (for garnish or mixed into rice)
- 1 teaspoon furikake (Japanese seasoning blend)
- 1/4 teaspoon lemon zest for brightness
Ingredient Notes and Substitutions
- Sushi rice: Short-grain rice absorbs moisture evenly and holds together better than long-grain varieties, creating the right texture for onigiri. If you can’t find sushi rice, use any short-grain white rice or cook regular rice with a touch of rice vinegar and sugar to mimic sushi rice flavor.
- Salmon: Canned salmon is convenient and shelf-stable, making it perfect for quick meals. Fresh cooked salmon or even smoked salmon work beautifully, though smoked salmon adds extra salt, so adjust your salt content accordingly.
- Nori sheets: The crispy seaweed wrapper adds umami and makes the rice balls easier to hold. If you dislike nori or have an allergy, skip it entirely, though the balls won’t hold together quite as neatly.
- Mayonnaise: This ingredient adds creaminess and helps bind the salmon filling together. If avoiding dairy, use vegan mayo or simply omit it.
- Soy sauce: This brings saltiness and depth to the salmon. Tamari works as a gluten-free alternative with virtually identical flavor.
How to Make Salmon Onigiri
Step 1: Prepare Your Salmon Filling
In a small bowl, combine flaked salmon with mayonnaise, soy sauce, and wasabi if using. Mix gently with a fork until well combined but not mushy, keeping some texture visible in the salmon. Set this mixture aside while you prepare your workspace.
Step 2: Set Up Your Assembly Station
Place a small bowl of water nearby and dampen a clean kitchen towel with it. Lay out a small plate or cutting board where you’ll shape your onigiri, and arrange your nori strips within arm’s reach. Having everything organized before you start keeps the process smooth and prevents the rice from drying out.
Step 3: Wet Your Hands
Dip your hands into the water bowl and keep them lightly damp throughout the process. This prevents the sticky rice from clinging to your palms and helps you achieve a smooth, compact ball. Rewet your hands between each onigiri as needed.
Step 4: Portion Out the Rice
Scoop roughly 1/3 cup of cooled rice into your damp palm and gently form it into a loose ball. The rice should be at room temperature or cool, as warm rice sticks uncomfortably and becomes mushy. If the rice is still hot, spread it on a plate and let it cool for 5 to 10 minutes before handling.
Step 5: Create the Pocket for Filling
Using your thumb, push a small indent into the center of the rice ball without pushing all the way through the bottom. This pocket should be about the size of your thumbnail and deep enough to hold roughly one tablespoon of salmon filling. Leave enough rice on all sides to seal the filling completely so it doesn’t leak out.
Step 6: Add Your Salmon Filling
Spoon one tablespoon of the prepared salmon mixture into the pocket you created. Don’t overstuff; too much filling makes shaping difficult and causes the rice ball to collapse. A modest amount of filling ensures a clean, compact final shape.
Step 7: Seal and Shape the Onigiri
Gently fold the rice around the filling by cupping your hand and rotating the ball slightly, using your thumb and fingers to fold the rice inward until the filling is completely covered. Once sealed, place the ball in your palm and gently press it into a triangle by using your three middle fingers to create three flat sides. Apply even pressure without squeezing too hard, which compresses the rice too much.
Step 8: Wrap with Nori
Take one nori strip and wrap it around the middle or bottom of the rice triangle where your fingers grip it. The nori should be snug enough to hold the onigiri together but not so tight that it tears. The slight humidity from the rice helps the nori adhere naturally without any additional sealing needed.
Step 9: Final Touches and Storage
If desired, sprinkle toasted sesame seeds or furikake over the top of the finished onigiri for extra flavor and visual appeal. Arrange the completed rice balls on a plate and serve immediately, or wrap them individually in plastic wrap for portable lunches. They taste best eaten within a few hours of assembly, though they stay safe to eat for up to one day when stored properly.
Pro Tip: Keep your hands cool and damp throughout the shaping process, rewetting them between each onigiri, and the rice will slide together smoothly instead of sticking to your skin.
Tips for the Best Salmon Onigiri
- Use sushi rice or short-grain rice that has been seasoned with a touch of rice vinegar and salt; this creates better texture and flavor than plain rice alone.
- Cool the rice completely before shaping so it holds together properly and feels pleasant to handle rather than uncomfortably hot.
- Don’t overfill the onigiri; a small pocket with one tablespoon of salmon is the sweet spot for easy shaping and eating.
- Wrap the nori just before serving if possible, as nori can absorb moisture and lose its crispness if wrapped too far in advance.
- Experiment with different fillings like umeboshi (pickled plum), kombu (seaweed), or grilled salmon skin to discover your favorite flavor combination.
- If the rice balls start sliding apart during assembly, it usually means your rice was too warm or too loose; let it cool a bit more and pack it more firmly.
Common Mistakes to Avoid
- Using warm rice will cause the grains to stick excessively to your hands and collapse when shaped, making the finished onigiri dense and unappetizing.
- Overstuffing the salmon filling prevents proper sealing and causes the rice ball to fall apart or leak during eating.
- Skipping the nori wrapper makes the rice balls harder to hold and removes the pleasant textural contrast that makes eating them enjoyable.
- Wrapping nori too far in advance allows it to absorb moisture from the rice and become soggy rather than crispy.
- Squeezing the rice too hard during shaping compacts it excessively, making the finished onigiri dense, tough, and unpleasant to bite into.
Serving Suggestions
Salmon onigiri shine as a standalone lunch or snack but pair beautifully with simple sides that don’t overwhelm their delicate flavors. Serve them chilled or at room temperature for maximum enjoyment.
- Pack with edamame and cucumber slices for a light, refreshing lunch box.
- Pair with miso soup and pickled vegetables for a more complete Japanese-style meal.
- Serve alongside a simple green salad with sesame dressing for a balanced lunch.
- Include in a bento box with tamagoyaki (Japanese egg omelet) and steamed broccoli.
- Enjoy plain with a cup of green tea for a simple, satisfying afternoon snack.
Variations to Try
- Spicy Mayo Salmon: Mix sriracha or chili paste into the mayonnaise before combining with salmon for a modern, zesty kick that pairs wonderfully with the nori.
- Teriyaki Salmon: Glaze cooked salmon pieces with teriyaki sauce and let them cool before using as a filling; the sweet-savory depth transforms the flavor profile.
- Salmon with Cream Cheese: Layer thin slices of cream cheese with flaked salmon for a richer, almost lox-like experience that appeals to Western palates.
- Smoked Salmon and Cucumber: Combine smoked salmon with thin cucumber slices and a dab of wasabi mayo for a refreshing, lighter variation.
- Salmon Roe (Ikura) Version: Replace the filling entirely with salmon roe for a luxurious, jewel-toned onigiri that impresses guests and feels special.
Dietary Adaptations
- Gluten-Free: Use tamari instead of regular soy sauce and verify that your nori sheets contain no additives; the recipe is naturally gluten-free otherwise.
- Dairy-Free: Replace mayonnaise with vegan mayo or simply omit it, which still yields delicious onigiri with slightly less creaminess.
- Vegan/Vegetarian: Substitute salmon with seasoned tofu crumbles, marinated mushrooms, or crispy tempeh for a plant-based filling that maintains satisfying texture and umami depth.
- Low-Carb/Keto: Use cauliflower rice mixed with a small amount of regular rice to reduce carbohydrates, though the texture will be slightly less cohesive than traditional onigiri.
Storage and Reheating
Refrigerator
Store wrapped onigiri in an airtight container on a paper towel to absorb any excess moisture. They keep safely for up to one day in the refrigerator, though nori will lose crispness over time.
- Store unwrapped and add nori just before eating if you prefer maximum crispness.
- Keep in a sealed container away from strong-smelling foods, as rice absorbs odors easily.
Freezer
Onigiri freeze well for up to two months when wrapped individually in plastic wrap and placed in a freezer bag. Thaw overnight in the refrigerator before eating.
- Freeze unwrapped for best nori texture if you plan to wrap them after thawing.
- Label your container with the date and contents for easy identification later.
Reheating
Onigiri taste best served cold or at room temperature, so reheating is rarely necessary. If you prefer them warm, microwave for 20 to 30 seconds wrapped in a damp paper towel to restore softness without drying them out.
- Remove nori before microwaving to prevent sogginess.
- Don’t overheat, which toughens the rice texture.
Nutrition Information
| Nutrient | Amount |
|---|---|
| Calories | 180 |
| Total Fat | 4g |
| Saturated Fat | 1g |
| Carbohydrates | 28g |
| Fiber | 1g |
| Sugar | 0g |
| Protein | 9g |
| Sodium | 320mg |
| Cholesterol | 15mg |
Nutritional values are approximate and calculated based on standard ingredient amounts using canned salmon. Values vary based on specific brands and any modifications you make to the recipe.
Frequently Asked Questions
Can I use regular cooked salmon instead of canned?
Absolutely; flaked cooked salmon works beautifully and often tastes fresher. Just ensure it’s cooled completely and any bones are removed before mixing with the other filling ingredients.
How far in advance can I make these onigiri?
You can shape them up to four hours ahead and keep them covered at room temperature, or refrigerate them overnight. Add nori just before serving for maximum crispness.
My rice balls are falling apart during shaping. What’s wrong?
Your rice is likely too warm or too loose. Cool it completely to room temperature and pack it slightly more firmly when forming the initial ball, but avoid squeezing so hard that it becomes dense.
What if I don’t like wasabi?
Wasabi is entirely optional; the onigiri taste wonderful without it. You can substitute a squeeze of fresh lemon juice or a pinch of furikake for subtle flavor instead.
Are these good for meal prep?
Yes, they freeze beautifully for up to two months, making them perfect for meal prep. Thaw them overnight in the refrigerator and they’re ready to eat the next day.
Can I make these with leftover rice?
Yes, day-old rice is actually ideal because it’s drier and holds together better than fresh rice. Reheat it gently in the microwave with a splash of water if it feels too stiff.
What’s the best way to hold the onigiri while eating?
Grip the nori wrapper so your fingers don’t directly touch the rice, which stays cleaner and more presentable. The nori strip is designed specifically for this purpose.
Final Thoughts
Making salmon onigiri taught me that some of the most delicious foods require almost no cooking skill, just a little practice with your hands. These rice balls are genuinely fun to create, rewarding to eat, and impressive enough to share with friends or pack in lunch boxes without apology.
Give this recipe a try and discover why onigiri have been feeding Japanese families and travelers for centuries. Start with the basic salmon filling, then experiment with variations once you’re comfortable with the shaping technique. You’ll find yourself reaching for this recipe again and again.
Salmon Onigiri
Ingredients
Equipment
Method
- In a small bowl, combine flaked salmon with mayonnaise, soy sauce, and wasabi if using. Mix gently with a fork until well combined but not mushy, keeping some texture visible in the salmon. Set aside.
- Place a small bowl of water nearby and dampen a clean kitchen towel with it. Lay out a small plate or cutting board where you'll shape your onigiri, and arrange your nori strips within arm's reach.
- Dip your hands into the water bowl and keep them lightly damp throughout the process to prevent rice from sticking. Rewet hands as needed.
- Scoop roughly 1/3 cup of cooled rice into your damp palm and gently form it into a loose ball. Ensure rice is at room temperature or cooler.
- Using your thumb, push a small indent into the center of the rice ball about the size of your thumbnail, deep enough to hold about one tablespoon of salmon filling.
- Spoon one tablespoon of the prepared salmon mixture into the indent. Do not overfill.
- Gently fold the rice around the filling by cupping your hand and rotating the ball, folding rice inward to completely cover the filling.
- Press the sealed rice ball gently into a triangle shape using your three middle fingers to create three flat sides, applying even pressure without squeezing too hard.
- Wrap one nori strip around the middle or bottom of the rice triangle where your fingers grip it, ensuring it is snug but not tearing.
- If desired, sprinkle toasted sesame seeds or furikake on top for extra flavor and visual appeal.
- Arrange completed onigiri on a plate and serve immediately or wrap individually in plastic wrap for portable lunches. Best eaten within a few hours.