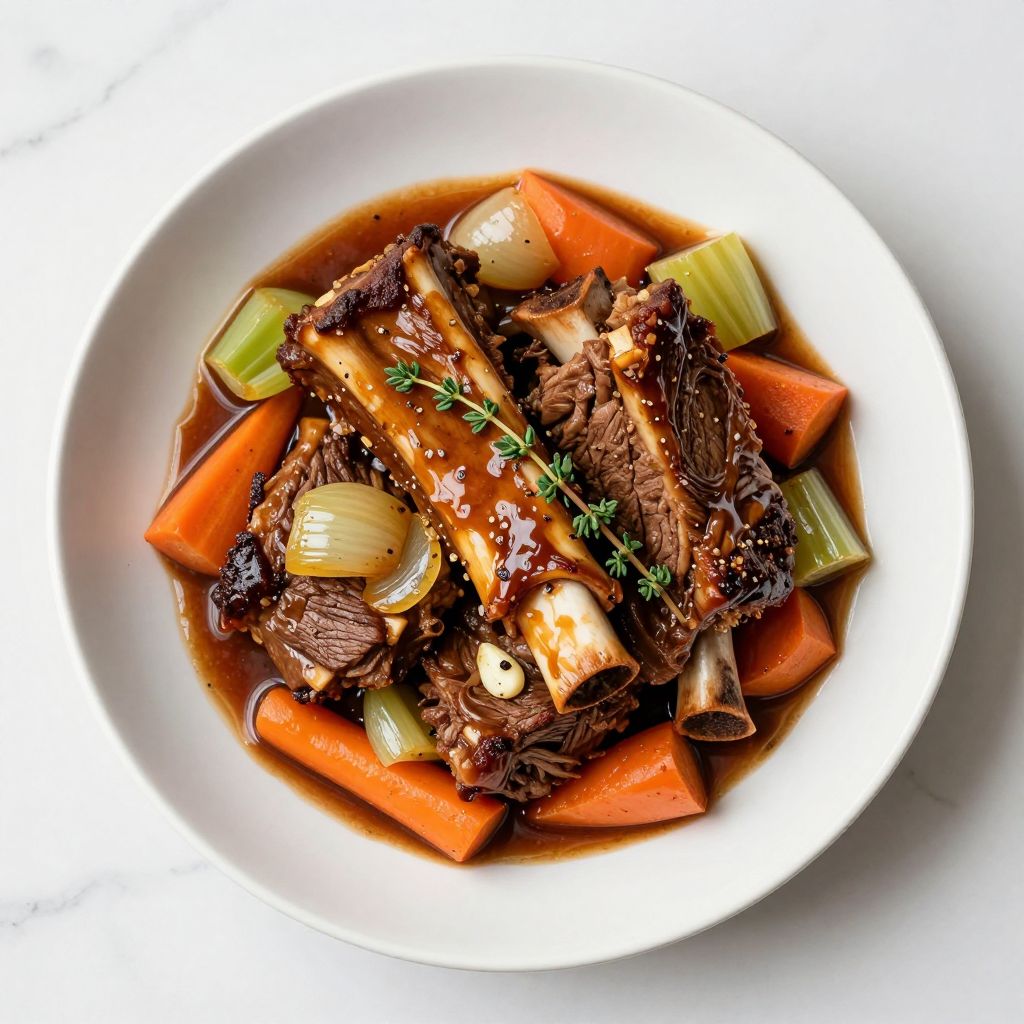
Neck bones recipe delivers fall-apart tender meat with rich, savory broth that makes your kitchen smell incredible. These often-overlooked cuts become a showstopper when braised low and slow with aromatics and spices.
If you’ve never cooked neck bones before, you’re missing out on one of the most forgiving and rewarding dishes in the kitchen. The meat clings to the bone, absorbs every bit of flavor you throw at it, and creates a silky sauce that begs for cornbread or rice.
Why You’ll Love This Recipe
Neck bones are budget-friendly, packed with collagen that transforms into gelatin, and they reward patient cooking with incredible depth of flavor. This recipe turns a humble cut into something worthy of your best dinner table.
- Incredibly affordable compared to other meat cuts
- Tender, juicy meat that falls right off the bone
- Creates a naturally rich, silky gravy without cream
- One-pot meal that handles most of the work itself
- Reheats beautifully and tastes even better the next day
My Experience Making This Recipe
The first time I made neck bones, I was skeptical about the humble ingredient sitting in my Dutch oven. After three hours of low-heat braising, I pulled the lid back and got hit with this wave of savory, meaty aroma that made me a believer instantly.
My family demolished it without asking questions, and my mom actually asked for the recipe, which never happens. The meat was so tender that my eight-year-old ate it without complaint, and the sauce was rich enough that we were literally scraping the pot clean.
I’ve made this at least a dozen times now, and it’s become my go-to when I want something impressive but don’t have a lot of active cooking time. Every batch comes out perfectly, which is partly why I’m sharing it with you.
Recipe Overview
- Recipe Name: Neck Bones Recipe
- Servings: 4 to 6
- Prep Time: 15 minutes
- Cook Time: 3 hours
- Total Time: 3 hours 15 minutes
- Course: Main Dish
- Cuisine: American Soul Food
- Calories per Serving: 320
Equipment You Will Need
- Large Dutch oven or heavy braising pot with lid
- Sharp chef’s knife for chopping vegetables
- Cutting board
- Paper towels for patting meat dry
- Large spoon or tongs for turning meat
- Meat thermometer (optional but helpful)
- Measuring spoons and cups
- Small bowl for mixing spices
Ingredients for Neck Bones Recipe
- 4 pounds beef neck bones, cut into 2 to 3 inch pieces
- 2 tablespoons kosher salt, divided
- 1 tablespoon black pepper
- 1 teaspoon garlic powder
- 1 teaspoon onion powder
- 1/2 teaspoon cayenne pepper
- 3 tablespoons vegetable oil
- 1 large yellow onion, cut into quarters
- 4 medium carrots, cut into 2 inch chunks
- 4 celery stalks, cut into 2 inch pieces
- 6 garlic cloves, smashed
- 4 cups beef broth
- 1 cup water
- 2 bay leaves
- 3 fresh thyme sprigs
- 1 teaspoon Worcestershire sauce
- 1/2 teaspoon hot sauce (optional but recommended)
Ingredient Notes and Substitutions
- Beef neck bones provide collagen and marrow that enrich the broth naturally. Pork neck bones work as a substitute and cook in the same time, offering a slightly lighter flavor.
- Kosher salt dissolves evenly and doesn’t have additives. Table salt works but use about 25 percent less since it’s denser.
- Beef broth is the backbone of your sauce, delivering meaty depth. Chicken broth lightens the dish but works if that’s what you have on hand.
- Worcestershire sauce adds umami and tang that rounds out flavors. Soy sauce or tamari can replace it in equal amounts for a slightly different but equally delicious result.
- Fresh thyme brings herbal freshness that balances the richness. Dried thyme uses half the amount and works fine if fresh isn’t available.
How to Make Neck Bones Recipe
Step 1: Pat the Neck Bones Dry
Remove your neck bones from the package and pat them completely dry with paper towels. Moisture on the surface prevents proper browning, so spend a minute making sure they’re as dry as possible.
Step 2: Season the Meat
In a small bowl, combine 1 tablespoon of kosher salt, black pepper, garlic powder, onion powder, and cayenne pepper. Rub this spice mixture generously all over each piece of neck bone, making sure to coat every crevice.
Step 3: Heat Your Dutch Oven
Place your Dutch oven over medium-high heat and let it get hot for about two minutes. Add the vegetable oil and let it shimmer, which means it’s ready to sear your meat.
Step 4: Sear the Neck Bones
Working in batches so you don’t crowd the pot, place the neck bones in the hot oil and let them sear without moving them for about three to four minutes per side. This browning step creates depth of flavor through a process called the Maillard reaction, which is where all that delicious savory taste comes from.
Step 5: Remove the Meat and Build the Base
Transfer all the seared neck bones to a clean plate and set aside. Lower the heat to medium, add the onion, carrots, and celery to the same pot, and cook for about five minutes, stirring occasionally, until the vegetables begin to soften.
Step 6: Add Aromatics and Deglaze
Add the smashed garlic cloves and stir for about one minute until fragrant. Pour in the beef broth and water, scraping the bottom of the pot with a spoon to lift up all the brown bits stuck there, since those bits carry incredible flavor.
Step 7: Return the Meat and Add Seasonings
Nestle the seared neck bones back into the pot along with any juices that collected on the plate. Add the bay leaves, thyme sprigs, remaining 1 tablespoon of salt, Worcestershire sauce, and hot sauce if you’re using it.
Step 8: Braise Low and Slow
Bring the liquid to a gentle simmer on the stovetop, then cover the pot with a lid and transfer it to a 325-degree oven. Braise for two and a half to three hours, until the meat is so tender it barely clings to the bone and a fork easily pierces the meat.
Step 9: Skim and Taste
Remove the pot from the oven and carefully skim any excess fat from the surface with a spoon. Taste the sauce and adjust the salt and pepper as needed, since flavors concentrate during cooking and you might need a small boost.
Pro Tip: Don’t skip the searing step, even though it seems like extra work. Those browned bits transform your sauce from good to absolutely unforgettable.
Tips for the Best Neck Bones Recipe
- Cut your neck bones into similar sizes so they cook evenly and finish at the same time. Uneven pieces mean some meat overcooked while others are still tough.
- Use a meat thermometer to check for doneness if you’re nervous. The meat should reach 190 degrees Fahrenheit for maximum tenderness.
- Don’t rush the braising time by raising the temperature, since high heat toughens the meat and causes it to shrink away from the bone. Low and slow is the only way.
- Make this recipe a day ahead if you have time, since the flavors deepen overnight and the fat solidifies on top for easy removal. Reheat gently before serving.
- Keep the oven temperature steady by using an oven thermometer if yours tends to run hot or cold. Even a 25-degree difference can affect cooking time.
- Save the cooking liquid even after you eat the meat, since it makes incredible soup when frozen and thawed later. That liquid gold is pure collagen and flavor.
Common Mistakes to Avoid
- Overcrowding the pot during searing means the meat steams instead of browns, and you end up with gray meat instead of beautiful caramelized edges. Sear in batches.
- Cooking at too high a temperature dries out the meat and makes it tough even though it’s been braising. Keep that oven at 325 degrees.
- Skipping the searing step saves time but costs you massive flavor depth. Those browned bits are not optional.
- Adding too much liquid drowns the flavors and creates broth instead of sauce. You want just enough to barely cover the meat.
- Lifting the lid constantly lets heat escape and extends cooking time. Resist the urge to peek more than once.
Serving Suggestions
Neck bones shine when served with something to soak up that incredible sauce. The meat pulls right off the bone, making it perfect for casual family dinners where people can interact with their food.
- Serve over creamy mashed potatoes so the sauce soaks right in
- Pair with white or yellow rice to catch every drop of gravy
- Serve with buttered cornbread on the side for dipping
- Offer egg noodles for a comforting, rustic presentation
- Serve with collard greens or another leafy green on the side for balance
Variations to Try
- Add a tablespoon of tomato paste in step six for a slightly tangy depth and deeper color that enhances the savory notes. This version leans more towards a stew consistency.
- Replace half the beef broth with red wine for richness and a subtle acidity that cuts through the fat. This makes the sauce more complex and restaurant-quality.
- Add a tablespoon of balsamic vinegar and a teaspoon of honey in the last 30 minutes of cooking for a sweet and tangy version that appeals to different palates.
- Throw in a half pound of mushrooms in step five for earthy umami that amplifies the savory flavors without changing the cooking time.
- Make it spicy by doubling the cayenne pepper and hot sauce, then serve with pickled peppers on the side for a completely different flavor profile.
Dietary Adaptations
- Gluten-free: This recipe is naturally gluten-free as written, but verify that your Worcestershire sauce and hot sauce are certified gluten-free since some brands contain barley.
- Dairy-free: The recipe contains no dairy, so it’s automatically dairy-free without any substitutions needed.
- Vegan or vegetarian: Substitute the neck bones with mushroom stems and hearty vegetables like cauliflower steaks, though the cooking time reduces to 90 minutes since vegetables cook faster than meat.
- Low-carb or keto: This recipe fits perfectly into low-carb eating since the meat and sauce have minimal carbs. Serve over cauliflower rice or zucchini noodles instead of potatoes.
Storage and Reheating
Refrigerator
Transfer cooled neck bones to an airtight container where they keep for up to four days. The flavors actually improve as the sauce mingles overnight.
- Let cool completely before covering to avoid condensation
- Store the meat and sauce together in the same container
- The fat will solidify on top, making it easy to remove if you prefer
Freezer
Frozen neck bones last up to three months in an airtight container or freezer bag. The braising liquid protects the meat and prevents freezer burn.
- Leave an inch of headspace in the container since liquid expands when frozen
- Label the container with the date so you know how long it’s been frozen
- Thaw overnight in the refrigerator before reheating for best results
Reheating
Reheat gently in a covered pot over medium heat to avoid drying out the meat. Stovetop reheating takes about 20 to 25 minutes for a full batch.
- Add a splash of broth if the sauce seems too thick after storage
- Heat until it reaches a gentle simmer, not a rolling boil
- Microwave individual portions at 50 percent power for about three minutes for faster results
Nutrition Information
| Nutrient | Amount |
|---|---|
| Calories | 320 |
| Total Fat | 18g |
| Saturated Fat | 7g |
| Carbohydrates | 6g |
| Fiber | 1g |
| Sugar | 2g |
| Protein | 38g |
| Sodium | 580mg |
| Cholesterol | 85mg |
These values are estimates based on standard ingredients and cooking methods. Nutrition varies depending on specific brands used and how much sauce each serving contains.
Frequently Asked Questions
Can I use a slow cooker instead of the oven?
Yes, sear the meat on the stovetop as directed, then transfer everything to a slow cooker on low for six to eight hours. The long, gentle heat works the same way and produces equally tender results.
What if my neck bones come out tough?
Tough meat means they didn’t cook long enough or the temperature was too high. Return them to the oven and braise for another 30 to 45 minutes until fork-tender.
Can I make this recipe ahead of time?
Absolutely, and I recommend it since flavors deepen overnight. Cook completely, cool, and refrigerate for up to four days, or freeze for up to three months.
Why is my sauce too thin?
After you remove the meat, simmer the uncovered pot on the stovetop over medium-high heat for 10 to 15 minutes to reduce and thicken the sauce naturally. This concentrates the flavors too.
Can I substitute pork neck bones?
Pork neck bones work beautifully and cook in the same time with similar results, though the flavor is lighter and slightly more delicate. They’re often cheaper than beef neck bones too.
Do I need to remove the bay leaves and thyme before serving?
Yes, fish out the bay leaves and thyme sprigs before serving since they’re not meant to be eaten. They’ve already given their flavor to the sauce.
Final Thoughts
Neck bones are one of those ingredients that separates home cooks who know what they’re doing from people who just follow recipes. When you master this cut, you’ll realize there’s no such thing as tough or undesirable meat, just meat that hasn’t been cooked the right way.
Make this recipe this weekend and watch how your family reacts when you put a bowl of these tender, flavorful bones on the table. You’ll have a new go-to dish that tastes like you spent all day in the kitchen even though most of that time was hands-off.
Neck Bones Recipe
Ingredients
Equipment
Method
- Remove neck bones from the package and pat them completely dry with paper towels to ensure proper browning.
- In a small bowl, combine 1 tablespoon of kosher salt, black pepper, garlic powder, onion powder, and cayenne pepper. Rub this spice mixture generously over each piece of neck bone.
- Heat a large Dutch oven over medium-high heat for about two minutes. Add vegetable oil and let it shimmer.
- Working in batches, sear neck bones in hot oil without moving for 3 to 4 minutes per side until deeply browned.
- Transfer seared neck bones to a clean plate and set aside.
- Reduce heat to medium, add onion, carrots, and celery to the pot and cook for 5 minutes, stirring occasionally until vegetables soften.
- Add smashed garlic cloves and cook, stirring, for 1 minute until fragrant.
- Pour in beef broth and water, scraping bottom of pot to loosen browned bits.
- Return neck bones and any juices to the pot. Add bay leaves, thyme sprigs, remaining 1 tablespoon kosher salt, Worcestershire sauce, and hot sauce if using.
- Bring liquid to a gentle simmer on stovetop, cover pot with lid, and transfer to a 325°F oven. Braise for 2½ to 3 hours until meat is fork-tender and falls off the bone.
- Remove pot from oven and skim excess fat from surface with a spoon.
- Taste sauce and adjust salt and pepper as needed before serving.