Canned tuna recipes are the weeknight hero that saves dinner when you’re short on time and ingredients. This pantry staple transforms into everything from quick pasta dishes to protein-packed salads in minutes, making it perfect for busy families and anyone craving something satisfying without the fuss.
Whether you’re looking for a no-cook lunch or a hearty main course, canned tuna delivers protein and omega-3 fatty acids without requiring a trip to the fishmonger. Let’s explore the best ways to turn this humble can into meals your whole family will actually enjoy.
Why You’ll Love This Recipe
Canned tuna meals solve the real problem of what to eat when you forgot to plan dinner.
- Requires just 15 minutes or less from start to plate
- Budget-friendly protein source that costs under a dollar per serving
- Packed with omega-3 fatty acids and lean protein for sustained energy
- Infinitely adaptable to whatever vegetables and pantry items you have on hand
- No special cooking skills needed; even kitchen beginners succeed
My Experience Making This Recipe
I discovered the magic of canned tuna when I was in my first apartment, broke and hungry at 6 PM with nothing but a can opener and desperation. I mixed it with mayo, crackers, and whatever I could find, and honestly, it was delicious and taught me that simple ingredients don’t mean boring food.
Since then, I’ve made countless variations, from Mediterranean bowls loaded with olives and feta to creamy pasta bakes that my friends request by name. What surprises people most is how restaurant-quality these meals can taste when you season properly and don’t skimp on fresh ingredients like lemon and herbs.
My go-to move is keeping three cans in the cabinet at all times, because I’ve learned that canned tuna has saved me from takeout more times than I can count. The texture stays firm, the flavor stays neutral enough to work with any cuisine, and cleanup takes about two minutes flat.
Recipe Overview
- Recipe Name: Classic Canned Tuna Salad with Variations
- Servings: 2 to 3 servings
- Prep Time: 10 minutes
- Cook Time: 0 minutes
- Total Time: 10 minutes
- Course: Lunch or Light Dinner
- Cuisine: American
- Calories per Serving: 180 to 220 calories
Equipment You Will Need
- Can opener
- Colander or fine-mesh strainer
- Large mixing bowl
- Fork or wooden spoon for mixing
- Cutting board and sharp knife
- Measuring spoons and cups
- Small prep bowls for ingredients
Ingredients for Canned Tuna Salad
For the Base
- 2 cans (5 ounces each) canned tuna in water, drained and flaked
- 1/4 cup mayonnaise (adjust for creaminess preference)
- 1 tablespoon fresh lemon juice
- 1/2 teaspoon Dijon mustard
- Salt and black pepper to taste
For Mix-Ins
- 1/4 cup diced celery
- 2 tablespoons diced red onion
- 1/4 cup diced bell pepper (any color)
- 2 tablespoons fresh parsley, chopped
- 1 tablespoon capers (optional)
For Serving
- Bread, crackers, lettuce leaves, or mixed greens of choice
Ingredient Notes and Substitutions
- Canned tuna in water: Water-packed tuna is leaner than oil-packed, making it ideal for lighter meals and easier portion control. If you prefer a richer texture, use tuna packed in olive oil instead and reduce added mayo by half.
- Mayonnaise: Mayo creates the creamy base that holds everything together. Greek yogurt works as a lighter substitute but will slightly change the flavor profile and reduce creaminess.
- Fresh lemon juice: Lemon brightens the dish and masks any “fishy” taste some people dislike. Lime juice or white vinegar work equally well if you prefer different flavor notes.
- Dijon mustard: A small amount adds tang and complexity without overwhelming the dish. Whole grain mustard adds texture; regular yellow mustard works if that’s what you have.
- Celery and red onion: These vegetables add crunch and fresh flavor that prevent the salad from feeling mushy. Fennel or jicama provide similar crispness if you want to experiment.
How to Make Canned Tuna Salad
Step 1: Drain Your Tuna Properly
Open both cans of tuna and pour the contents into a fine-mesh strainer set over a bowl. Press the tuna gently with the back of a fork to release excess liquid; this prevents your salad from becoming watery and ensures better seasoning absorption.
Step 2: Transfer Tuna to Your Mixing Bowl
Flake the drained tuna with a fork into a large mixing bowl, breaking up any large chunks. This step matters because smaller flakes distribute flavoring more evenly and create a better texture throughout the salad.
Step 3: Make the Creamy Base
Add mayonnaise, fresh lemon juice, and Dijon mustard to the tuna in the bowl. Stir everything together until the ingredients are fully combined and the mixture looks uniformly creamy.
Step 4: Season Generously
Sprinkle salt and freshly cracked black pepper over the mixture to taste. Taste as you go since canned tuna needs proper seasoning to shine; many people under-salt this dish out of habit.
Step 5: Prepare and Add Your Vegetables
While your base is mixing, dice your celery, red onion, and bell pepper into small, uniform pieces. Adding vegetables to the mixture right away allows them to absorb the flavors of the mayo and lemon.
Step 6: Fold In the Mix-Ins
Gently fold the diced celery, red onion, bell pepper, fresh parsley, and capers into the tuna mixture using a fork or wooden spoon. Don’t overbeat; you want to maintain distinct texture and prevent the vegetables from breaking down into mush.
Step 7: Taste and Adjust
Take a small spoonful and taste it plain, then on a cracker if possible. Add more lemon juice for brightness, more mayo for creaminess, or more salt and pepper if needed; this is where you make it yours.
Step 8: Choose Your Serving Method and Serve
Spoon the tuna salad onto your choice of base: toasted bread, crackers, lettuce wraps, or a bed of fresh greens. Serve immediately while the vegetables are still crisp and the flavors are most vibrant.
Pro Tip: Drain your canned tuna thoroughly by pressing it gently in a fine-mesh strainer, which removes excess liquid and prevents a soggy, watered-down salad that falls apart.
Tips for the Best Canned Tuna Salad
- Use high-quality mayonnaise like Duke’s or Hellmann’s, which makes a noticeable difference in flavor and creaminess compared to cheaper brands. Bad mayo ruins an otherwise perfect dish.
- Fresh lemon juice trumps bottled every single time; it takes thirty seconds to squeeze a lemon and tastes infinitely better. Keep a lemon in your fruit bowl specifically for moments like this.
- Add a tiny pinch of smoked paprika or a dash of hot sauce if you want subtle depth without obvious heat. These additions round out the flavors without announcing themselves.
- Make your tuna salad just before serving rather than hours in advance, since the vegetables will release water and soften the longer they sit. If you must make it ahead, store vegetables separately and fold them in right before eating.
- Consider adding a tablespoon of chopped fresh dill or tarragon for an herbaceous twist that pairs beautifully with tuna. Herbs elevate the dish from basic weeknight food to something you’d order at a deli.
Common Mistakes to Avoid
- Skipping the drain step and using liquid-packed tuna straight from the can creates a watery, falling-apart mess that tastes more like tuna juice than actual food. Always drain thoroughly.
- Using too much mayo turns the salad into mayo soup that masks the tuna flavor entirely. Start with 1/4 cup and add more if needed rather than starting with too much.
- Chopping vegetables too large means they don’t distribute evenly, leaving some bites crunchy and others muted. Aim for pieces about the size of a pea for consistent texture.
- Making it hours ahead causes vegetables to wilt and release water that dilutes all your seasonings. Prepare it within 30 minutes of eating for peak freshness.
- Forgetting to taste and adjust seasoning before serving results in a bland dish that tastes like sadness in a bowl. One extra minute of tasting fixes this completely.
Serving Suggestions
Canned tuna salad works for lunch boxes, quick dinners, and even casual entertaining when you need something filling in minutes. Serve it on toasted bread, over greens, or with crackers depending on your mood and what you have on hand.
- On a bed of mixed greens with cherry tomatoes, cucumber, and a light vinaigrette for a complete salad bowl
- Stuffed into hollowed tomatoes or bell peppers for an elegant presentation that looks homemade and special
- Between slices of toasted sourdough or ciabatta bread with lettuce and sliced tomato for a classic sandwich
- On whole grain crackers as an appetizer for unexpected guests or as a protein-packed snack
- Wrapped in butter lettuce leaves for a low-carb option that’s crisp and refreshing without bread
Variations to Try
- Mediterranean Style: Add kalamata olives, sun-dried tomatoes, feta cheese, and oregano instead of the standard vegetables. This version tastes like a vacation in a bowl and pairs beautifully with crusty bread.
- Asian-Inspired: Replace mayo with a mix of Greek yogurt and sriracha, add sesame seeds, chopped ginger, and serve over sushi rice or in lettuce wraps. This variation feels light and exciting compared to the classic version.
- Dill Pickle: Skip half the mayo, add dill relish, fresh dill, and a splash of pickle juice for a tangy, briny flavor that’s addictive. This version works especially well on rye bread for an open-faced sandwich.
- Avocado Smash: Mash half an avocado into the mayo base instead of using all mayo, then add your standard vegetables and extra lime juice. This creates a creamier, more interesting base without the mayo heaviness.
- Spicy Sriracha: Add one tablespoon of sriracha and a squeeze of lime juice to give the classic version a kick that builds gently on the back of your tongue. Serve with cilantro for brightness that complements the heat.
Dietary Adaptations
- Gluten-Free: Serve on gluten-free crackers, bread, or lettuce wraps instead of regular bread; the tuna salad itself contains no gluten. The trade-off is that gluten-free bread sometimes crumbles, so lettuce wraps are often more reliable.
- Dairy-Free: Replace mayo with dairy-free mayo or a blend of Greek yogurt and oil to maintain creaminess without dairy. The flavor changes slightly but remains delicious and satisfying.
- Vegan and Vegetarian: Substitute canned chickpeas or white beans mixed with nori seaweed for a similar texture and umami depth. The flavor won’t be identical but creates a surprisingly satisfying plant-based version.
- Low-Carb and Keto: Serve in lettuce wraps or over a salad instead of bread, and use full-fat mayo without modification. This adaptation keeps calories and fat high while dropping carbs to fit ketogenic macros.
Storage and Reheating
Refrigerator
Store leftover tuna salad in an airtight container on the coldest shelf of your refrigerator. It keeps safely for two to three days before the vegetables begin to wilt and the flavors start to fade.
- Keep vegetables and tuna mixture in separate containers if making ahead, then combine just before serving for maximum freshness
- Don’t store on bread or crackers; assemble these right before eating to prevent sogginess
Freezer
Canned tuna salad doesn’t freeze well because the texture of vegetables breaks down when thawed, and mayo separates. Skip freezing this dish and make fresh batches as needed instead.
- Unopened cans of tuna freeze indefinitely if you want to stock your freezer with backup protein
Reheating
Tuna salad is best served cold or at room temperature and doesn’t require reheating. If you must eat cold leftovers after refrigeration, simply remove from the fridge and serve within 30 minutes of taking it out.
- Never microwave tuna salad; this breaks down the texture and makes it unpleasant to eat
Nutrition Information
| Nutrient | Amount |
|---|---|
| Calories | 200 |
| Total Fat | 12 g |
| Saturated Fat | 2 g |
| Carbohydrates | 3 g |
| Fiber | 0.5 g |
| Sugar | 1 g |
| Protein | 22 g |
| Sodium | 480 mg |
| Cholesterol | 35 mg |
These values are approximate and based on using water-packed tuna and standard mayonnaise; using oil-packed tuna or Greek yogurt will change the nutritional profile slightly.
Frequently Asked Questions
Can I Use Fresh Tuna Instead of Canned?
Yes, though you’ll need to cook fresh tuna first by searing or poaching it, then flaking it into the salad. Fresh tuna will taste richer and more delicate, but canned works perfectly well for this quick recipe and costs significantly less.
How Do I Remove the “Fishy” Taste Some People Dislike?
Drain your tuna extremely well, then add plenty of fresh lemon juice and a splash of vinegar to mask any strong fish flavors. Most people who think they dislike tuna actually dislike poorly drained canned tuna that tastes overly fishy.
Can I Make This Recipe Without Mayonnaise?
Greek yogurt, sour cream, or avocado provide creaminess without mayo and create delicious variations with different flavor profiles. Start with less than you would mayo since these alternatives tend to be thicker and more strongly flavored.
How Long Can I Leave Tuna Salad Sitting Out at Room Temperature?
Leave it out for no more than two hours, and only one hour if your kitchen is warm. Mayo-based salads are prime breeding grounds for bacteria, so err on the side of caution and refrigerate quickly.
Is There a Way to Make This Salad Less Mayo-Heavy?
Cut the mayo in half and replace it with Greek yogurt, mashed avocado, or even a small amount of olive oil mixed with lemon juice. Experimenting with ratios lets you find your perfect balance between creamy and light.
What If I Don’t Have Fresh Vegetables on Hand?
Relish, pickled vegetables, capers, sun-dried tomatoes, or even frozen peas work beautifully and add crunch and flavor. Canned tuna is forgiving enough to work with whatever you actually have in your kitchen.
Final Thoughts
Canned tuna recipe don’t deserve their reputation as boring cafeteria food; they’re actually a vehicle for creativity and quick, nourishing meals that taste genuinely good. When you start with quality ingredients and season properly, you end up with something people request by name instead of tolerate out of necessity.
Keep a few cans in your pantry and make this salad whenever you need protein fast, energy for a long afternoon, or a lunch that doesn’t require planning. You’ll find yourself reaching for canned tuna far more often once you realize how many different ways you can enjoy it.
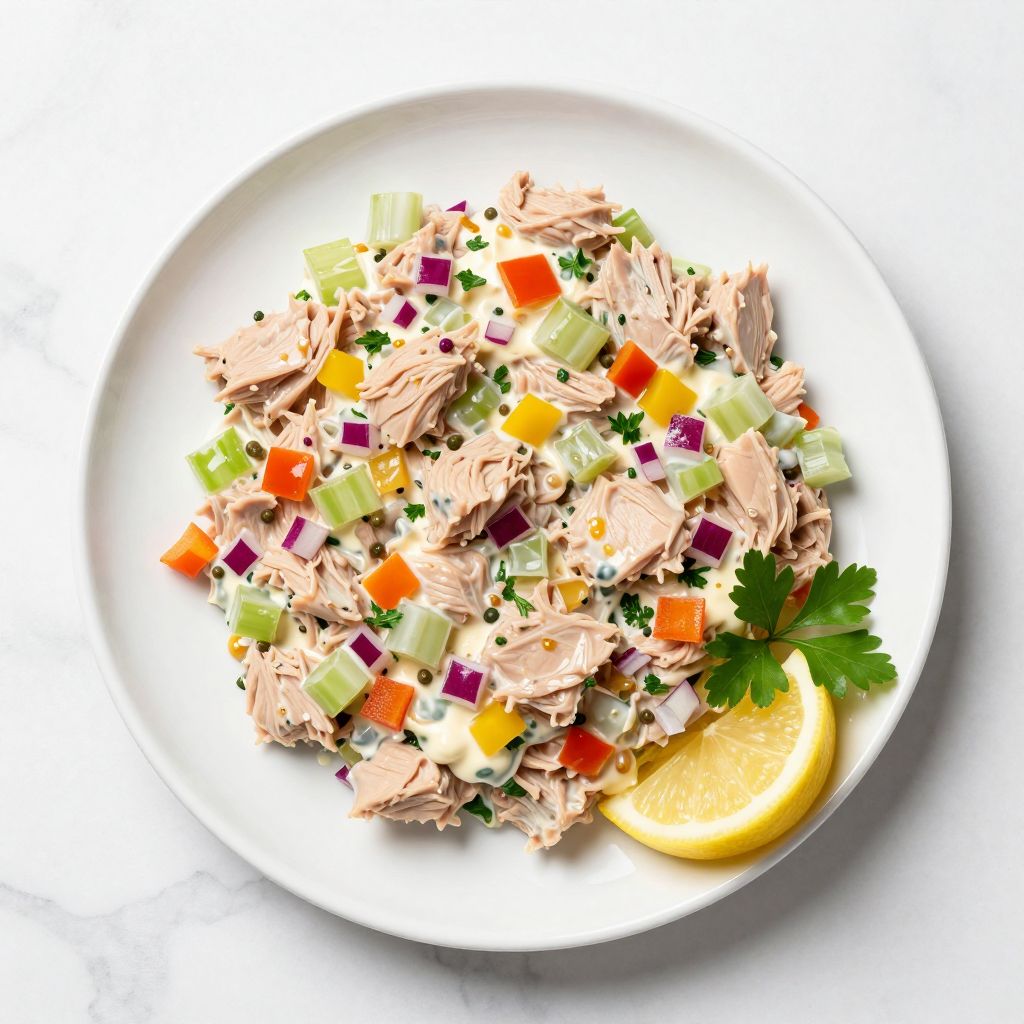
Classic Canned Tuna Salad with Variations
Ingredients
Equipment
Method
- Open both cans of tuna and pour the contents into a fine-mesh strainer set over a bowl. Press the tuna gently with the back of a fork to release excess liquid.
- Flake the drained tuna with a fork into a large mixing bowl, breaking up any large chunks.
- Add mayonnaise, fresh lemon juice, and Dijon mustard to the tuna in the bowl. Stir until fully combined and the mixture is uniformly creamy.
- Sprinkle salt and freshly cracked black pepper over the mixture to taste.
- Dice celery, red onion, and bell pepper into small, uniform pieces.
- Gently fold the diced celery, red onion, bell pepper, fresh parsley, and capers into the tuna mixture using a fork or wooden spoon. Avoid overmixing.
- Taste a small spoonful plain, then on a cracker if possible. Adjust by adding more lemon juice, mayo, salt, or pepper as desired.
- Spoon the tuna salad onto your choice of base: toasted bread, crackers, lettuce wraps, or fresh greens. Serve immediately.