Yakiniku sauce is the savory, slightly sweet condiment that transforms grilled meat into something unforgettable. This Japanese classic combines soy sauce, mirin, garlic, and ginger into a depth of flavor that works on beef, pork, chicken, or vegetables.
Learning to make this sauce at home takes five minutes and costs a fraction of restaurant versions. Once you taste homemade yakiniku sauce, you’ll never want the bottled stuff again.
Why You’ll Love This Recipe
This sauce is ridiculously easy to make and tastes professionally crafted. You probably already have every ingredient in your pantry right now.
- Ready in under 5 minutes with zero cooking required
- Rich umami flavor that enhances any grilled protein
- Naturally sweetened with mirin instead of refined sugar
- Makes enough to store for multiple grilling sessions
- Works as a marinade, dipping sauce, or finishing glaze
My Experience Making This Recipe
I discovered yakiniku sauce at a Japanese BBQ restaurant in Tokyo and immediately became obsessed with replicating it at home. After testing variations for weeks, I landed on this version that captures that perfect balance of savory, sweet, and garlicky goodness.
The first time I served this sauce at a backyard grilling party, three guests asked me where I bought the premium bottle. I loved watching their faces when I revealed I’d mixed it myself ten minutes before they arrived.
Now I make a batch every time I plan a grilling session, and it’s become my secret weapon for turning ordinary weeknight dinners into something special. The sauce keeps in the fridge for weeks, so you can always have it ready when the craving hits.
Recipe Overview
- Recipe Name: Homemade Yakiniku Sauce
- Servings: Makes about 1 cup
- Prep Time: 5 minutes
- Cook Time: 0 minutes
- Total Time: 5 minutes
- Course: Condiment
- Cuisine: Japanese
- Calories per Serving: 35 calories per 2 tablespoon serving
Equipment You Will Need
- Measuring cups and spoons
- Small mixing bowl
- Whisk or fork
- Glass jar with a tight-fitting lid for storage
- Fine mesh strainer (optional, for ultra-smooth texture)
Ingredients for Yakiniku Sauce
- 1/2 cup soy sauce
- 1/4 cup mirin (sweet rice wine)
- 3 tablespoons sake (or water if you don’t have sake)
- 4 cloves garlic, minced
- 1 tablespoon fresh ginger, minced
- 2 tablespoons brown sugar
- 1 tablespoon sesame oil
- 1 teaspoon rice vinegar
- 1/2 teaspoon white pepper
- 1/4 teaspoon red pepper flakes (optional, for heat)
- 1 tablespoon sesame seeds, lightly toasted
Ingredient Notes and Substitutions
- Soy sauce: This is the backbone of yakiniku sauce, providing the salty umami foundation that makes it addictive. If you only have low-sodium soy sauce, use it but reduce other salt sources and taste as you go.
- Mirin: This sweetened rice wine gives the sauce its signature glossy finish and subtle sweetness. You can substitute with a mix of 1 tablespoon honey plus 2 tablespoons water, though the flavor will be slightly different.
- Sake: This adds a dry, clean note that balances the sweetness. Plain water works in a pinch, but you’ll lose some complexity in the final flavor.
- Garlic: Fresh minced garlic brings sharp, pungent flavor that intensifies as the sauce sits. Garlic powder (1/2 teaspoon) is a fast backup, though fresh is always better.
- Ginger: Fresh ginger provides warmth and a slight spice that cuts through the richness. Powdered ginger (1/4 teaspoon) can substitute, but reduce the amount since it’s more concentrated.
- Sesame oil: This toasted oil adds a distinctive nutty aroma that screams “Japanese BBQ.” Do not skip this; it’s a core flavor component.
How to Make Yakiniku Sauce
Step 1: Pour the Soy Sauce Base
Pour 1/2 cup of soy sauce into your mixing bowl. This forms your salty foundation and should smell rich and slightly fermented, not thin or flat.
Step 2: Add the Mirin
Pour in 1/4 cup of mirin and stir to combine with the soy sauce. The mixture should look slightly glossy now, and you should smell the sweet undertones developing.
Step 3: Mix in the Sake
Add 3 tablespoons of sake and whisk everything together until smooth. This ingredient balances sweetness with a clean, dry note that prevents the sauce from tasting cloying.
Step 4: Prepare Your Aromatics
Mince 4 cloves of garlic and 1 tablespoon of fresh ginger as finely as you can manage. The smaller your pieces, the more evenly the flavors distribute throughout the sauce.
Step 5: Incorporate Garlic and Ginger
Stir the minced garlic and ginger into the liquid mixture. You should immediately notice the aroma becoming more pungent and complex, which is exactly what you want.
Step 6: Add the Brown Sugar and Sesame Oil
Stir in 2 tablespoons of brown sugar and 1 tablespoon of sesame oil. The brown sugar dissolves easily into the warm liquid (even without heat), and the sesame oil adds that unmistakable toasted aroma.
Step 7: Balance with Vinegar and Spices
Add 1 teaspoon of rice vinegar, 1/2 teaspoon of white pepper, and red pepper flakes if you like heat. The vinegar adds subtle brightness that cuts through the richness, while white pepper provides warmth without the visible black specks of black pepper.
Step 8: Finish with Sesame Seeds and Taste
Sprinkle 1 tablespoon of lightly toasted sesame seeds into the sauce and stir well. Taste a small spoonful and adjust: if it tastes too salty, add a touch more mirin; if it needs more depth, add a bit more garlic.
Pro Tip: Make this sauce at least 30 minutes before you grill so the garlic and ginger flavors fully infuse into the liquid.
Tips for the Best Yakiniku Sauce
- Use fresh garlic and ginger, never the jarred versions. Fresh aromatics taste bright and sharp, while jarred versions taste dull and slightly off.
- Toast your sesame seeds lightly in a dry pan for 1 minute before adding them. This intensifies their nutty flavor significantly compared to raw seeds.
- Store the sauce in a glass jar in the fridge and shake it well before each use, since the sediment settles over time. This keeps flavors evenly distributed.
- If you prefer a smoother texture, strain the sauce through a fine mesh strainer after mixing. This removes the garlic and ginger solids for a silkier consistency.
- Make a large batch and keep it in your fridge for up to three weeks. This takes five minutes now and saves you time during multiple grilling sessions.
- Brush the sauce onto meat during the last minute of grilling so it caramelizes without burning. Applying it too early causes the sugars to char black.
Common Mistakes to Avoid
- Using only garlic powder instead of fresh garlic. The powder tastes metallic and one-dimensional compared to the bright, sharp flavor of fresh cloves.
- Heating the sauce on the stovetop before using it. This breaks down the delicate garlic and ginger flavors and destroys the fresh brightness you worked to create.
- Forgetting the sesame oil entirely. Many home versions taste flat and boring because they’re missing this signature toasted note that makes the sauce recognizable as authentic yakiniku.
- Applying too much sauce at once during grilling. This causes excessive charring and bitterness instead of a thin, glossy caramelized coating.
- Skipping the rest period before grilling. Allowing the sauce to sit for at least 30 minutes lets the garlic and ginger fully infuse, making the flavor significantly more complex and rounded.
Serving Suggestions
This sauce works beautifully with any protein you throw on the grill, from tender beef ribeye to chicken thighs. Use it as a dipping sauce, a marinade, or a finishing brush to take your grilled dinner from good to restaurant-quality.
- Brush onto grilled beef short ribs (kalbi) during the last minute of cooking
- Serve as a dipping sauce alongside grilled chicken thighs and scallions
- Drizzle over grilled portobello mushrooms and tofu for a vegetarian option
- Use as a marinade for pork belly before grilling
- Combine with grilled shrimp and serve over steamed rice
Variations to Try
- Spicy Yakiniku: Add 1/2 teaspoon of gochugaru (Korean red chili flakes) or sriracha for a kick. This shifts the profile toward Korean BBQ while keeping the Japanese umami base intact.
- Pineapple Version: Replace 2 tablespoons of mirin with 2 tablespoons of fresh pineapple juice. The tropical sweetness complements pork and chicken beautifully, though you’ll lose some of the classic mirin character.
- Extra Garlic: Increase garlic to 6 cloves for a more pungent, aggressive flavor that some people prefer. This works especially well if you love grilled garlic alongside your meat.
- Apple-Based Sauce: Swap 2 tablespoons of mirin for 2 tablespoons of unsweetened apple juice concentrate. This adds subtle fruity depth that enhances beef more than the standard version.
- Ponzu-Style Twist: Add 2 tablespoons of fresh lemon or lime juice and reduce the soy sauce to 1/4 cup. This creates a brighter, more citrus-forward sauce that pairs wonderfully with seafood.
Dietary Adaptations
- Gluten-Free: Use tamari or gluten-free soy sauce instead of regular soy sauce, and verify your mirin is gluten-free (some brands contain barley). The flavor stays virtually identical, and this swap takes zero extra effort.
- Dairy-Free: This recipe is naturally dairy-free, so no changes needed. All ingredients are plant-based or animal protein that contains no dairy.
- Vegan/Vegetarian: This sauce is already vegan and vegetarian since it contains no meat or animal products. Use it on grilled vegetables, tofu, or tempeh for amazing results.
- Low-Carb/Keto: Replace the brown sugar and mirin with 2 tablespoons of soy sauce and 1 tablespoon of erythritol sweetener. You’ll reduce carbs significantly, though the flavor profile shifts slightly toward saltier and less rounded.
Storage and Reheating
Refrigerator
Store yakiniku sauce in a glass jar with a tight-fitting lid on a refrigerator shelf away from the door. The sauce keeps for up to three weeks.
- Always shake the jar before using since sediment settles
- Discard if you notice any off smells or mold growth
- The flavor actually improves slightly after a few days as the garlic and ginger infuse more deeply
Freezer
Yakiniku sauce freezes well for up to three months, though the fresh garlic and ginger flavors fade slightly over time. Freeze it in ice cube trays so you can thaw individual portions as needed.
- Pop out frozen cubes and store in a freezer bag for space efficiency
- Thaw in the refrigerator overnight before using
- Thawed sauce tastes best within one week of freezing
Reheating
Never heat yakiniku sauce on the stovetop, as this destroys the fresh garlic and ginger flavors. Simply thaw it in the refrigerator and use it cold or at room temperature as a dipping sauce or finishing glaze.
- If you want warm sauce for some reason, set the jar in warm water for a few minutes instead
- Cold sauce works better anyway for dipping, so embrace the temperature
Nutrition Information
| Nutrient | Amount |
|---|---|
| Calories | 35 |
| Total Fat | 1.5g |
| Saturated Fat | 0.2g |
| Carbohydrates | 4g |
| Fiber | 0.1g |
| Sugar | 3g |
| Protein | 1g |
| Sodium | 480mg |
| Cholesterol | 0mg |
Nutritional values are approximate and calculated per 2 tablespoon serving. These figures vary slightly depending on specific brand ingredients and exact measuring.
Frequently Asked Questions
Can I make yakiniku sauce without mirin?
Yes, mix 1 tablespoon of honey with 2 tablespoons of water to replace the mirin. The sauce will taste slightly different, with a more pronounced honey note instead of the subtle rice wine sweetness, but it will still be delicious.
How far in advance can I make this sauce?
Make it up to three days ahead and store it in the fridge in a glass jar. The flavors actually deepen and improve during this time as the garlic and ginger fully infuse into the liquid.
Is this sauce authentic to Japanese yakiniku restaurants?
This recipe captures the essential profile of most Japanese BBQ sauces, though variations exist between restaurants and regions. Restaurant versions sometimes contain additional ingredients like apple puree or fish sauce, but this version nails the core flavors.
What’s the difference between yakiniku sauce and teriyaki sauce?
Yakiniku sauce contains more garlic and ginger for a savory, umami-forward profile, while teriyaki sauce tends toward sweeter and more syrupy. Yakiniku works better for grilled meats, while teriyaki shines on glazed preparations.
Can I use this sauce as a marinade?
Absolutely, this sauce works beautifully as a marinade for two to eight hours before grilling. The longer you marinate, the more deeply the flavors penetrate the meat, though more than eight hours can start to break down the texture of delicate proteins like chicken breast.
Will the garlic burn if I brush this on meat while grilling?
Yes, if you apply it too early or use too much at once. Brush the sauce on during the final minute of grilling so it caramelizes without charring, and use a light hand rather than dumping it on.
Final Thoughts
Making homemade yakiniku sauce transforms your grilling game from average to impressive in just five minutes. Once you taste the fresh garlic, toasted sesame, and perfectly balanced sweetness of this version, store-bought sauce will taste flat and one-dimensional.
Fire up the grill this weekend and brush this sauce onto whatever meat you’re cooking. Your guests will ask where you got the restaurant-quality condiment, and you can smile knowing you mixed something better five minutes before they arrived.
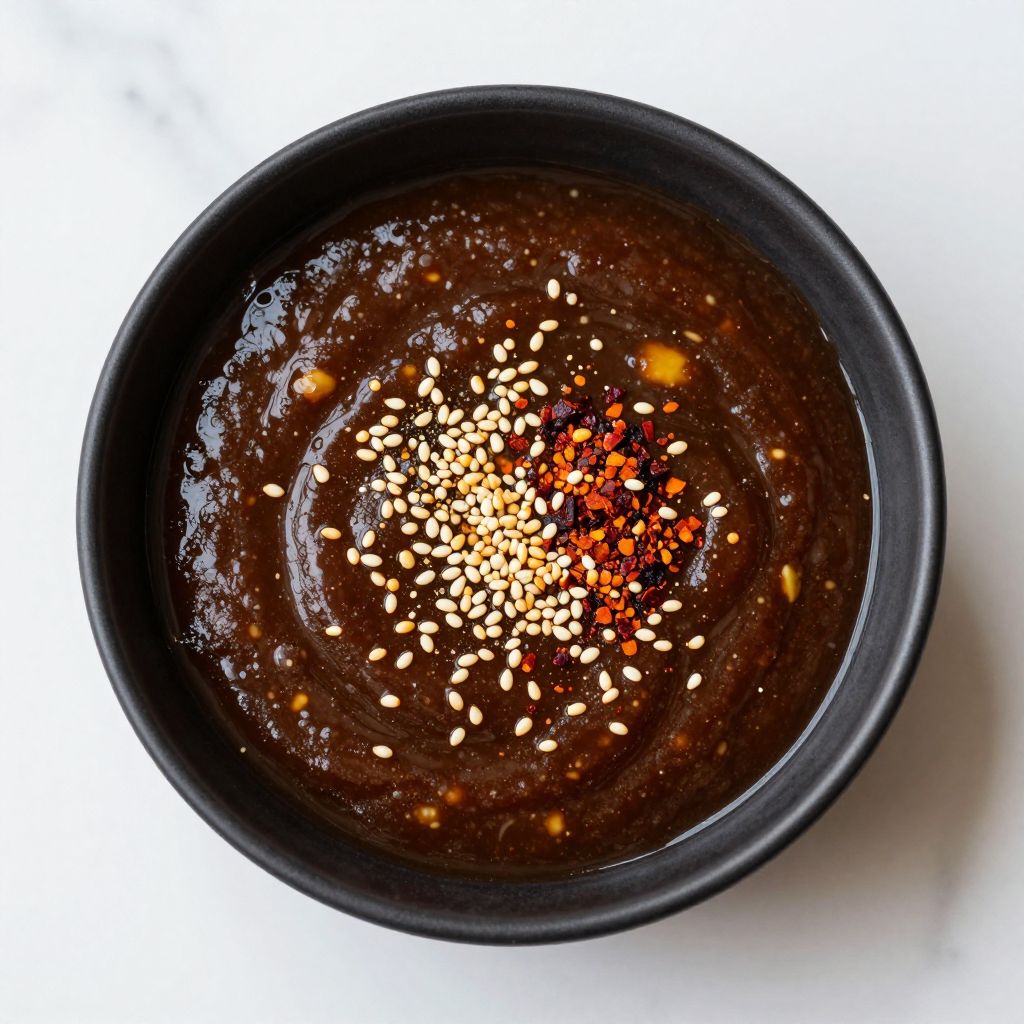
Homemade Yakiniku Sauce
Ingredients
Equipment
Method
- Pour 1/2 cup soy sauce into a mixing bowl.
- Add 1/4 cup mirin and stir to combine with the soy sauce until slightly glossy.
- Add 3 tablespoons sake and whisk until smooth.
- Mince 4 cloves garlic and 1 tablespoon fresh ginger finely.
- Stir the minced garlic and ginger into the liquid mixture.
- Add 2 tablespoons brown sugar and 1 tablespoon sesame oil, stirring until sugar dissolves and mixture is aromatic.
- Add 1 teaspoon rice vinegar, 1/2 teaspoon white pepper, and 1/4 teaspoon red pepper flakes if using; stir well.
- Sprinkle 1 tablespoon lightly toasted sesame seeds into the sauce and stir well.
- Taste and adjust seasoning if needed: add more mirin if too salty or more garlic for depth.
- Make at least 30 minutes before use to allow flavors to infuse.