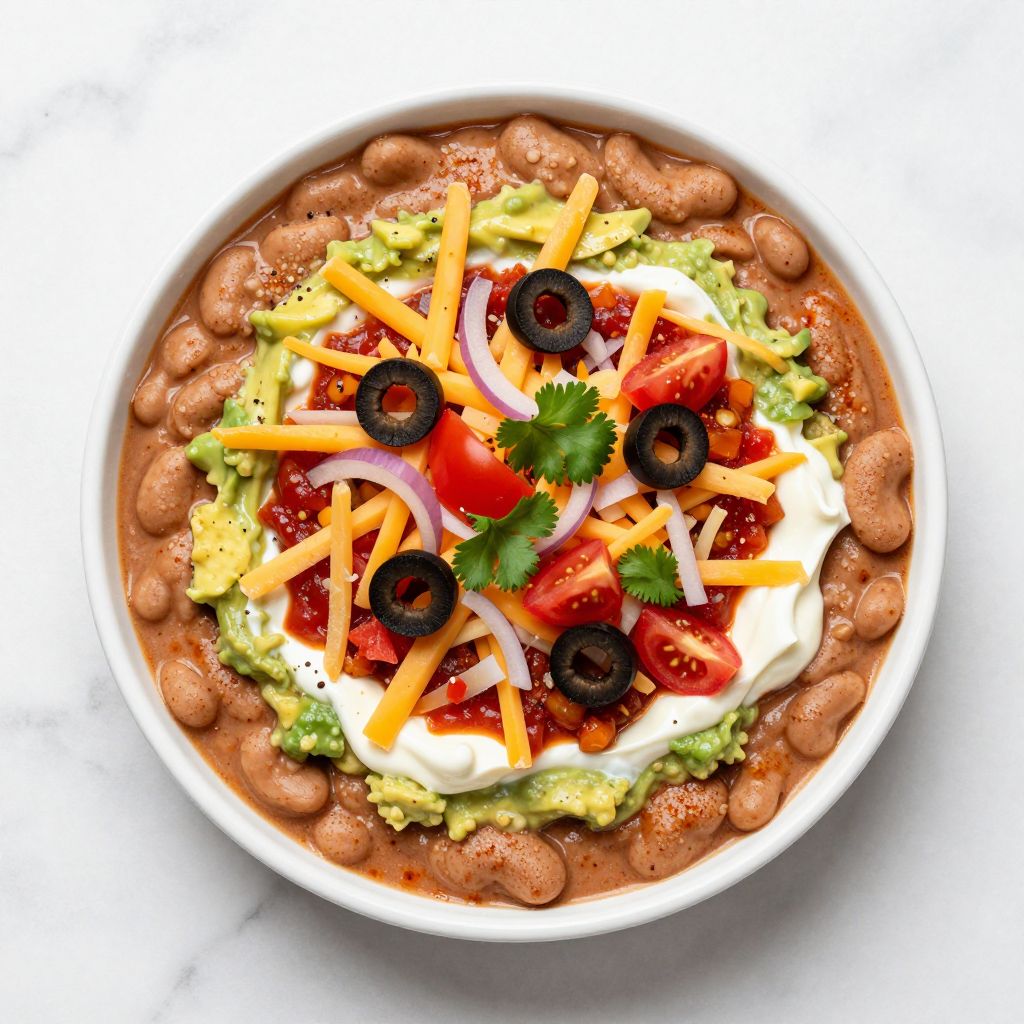
Layered bean dip is the ultimate crowd-pleaser that transforms simple pantry staples into a showstopping appetizer. This creamy, flavorful dip combines refried beans, guacamole, sour cream, cheese, and fresh toppings in gorgeous layers that look as good as they taste.
Whether you’re hosting a game day gathering, bringing a dish to a potluck, or just craving something satisfying with chips, this recipe delivers every single time. Let me walk you through how to build the perfect layered bean dip that will have your guests asking for the recipe.
Why You’ll Love This Recipe
This dip checks every box: it’s easy to assemble, feeds a crowd, and tastes absolutely delicious. Best of all, most of the components come together in minutes with zero cooking required.
- No oven needed, no advanced cooking skills required.
- Each layer adds a different flavor and texture that keeps things interesting.
- Naturally gluten-free and easily adaptable for dietary needs.
- Looks impressive on the table but takes less than 15 minutes to prepare.
- Tastes even better when made a few hours ahead, giving flavors time to meld.
My Experience Making This Recipe
I first made this dip for a Super Bowl party about five years ago, and it became my go-to appetizer ever since. My friends devoured it so quickly that I barely got to take a photo before the bowl was scraped clean.
The beauty of this recipe is how forgiving it is; you can adjust the layers based on what you have on hand. I’ve made it with different cheeses, added jalapeños for heat, and even swapped in black beans for variety, and it’s worked beautifully every time.
What I love most is watching people’s faces light up when they dig into a spoonful and hit each layer. The combination of creamy, fresh, tangy, and savory all at once is genuinely addictive.
Recipe Overview
- Recipe Name: Layered Bean Dip
- Servings: 8 to 10 people
- Prep Time: 15 minutes
- Cook Time: 0 minutes
- Total Time: 15 minutes
- Course: Appetizer
- Cuisine: Mexican-inspired
- Calories per Serving: 180 calories
Equipment You Will Need
- One 9-inch round or 8×8-inch square shallow baking dish or bowl
- Measuring cups and spoons
- A fork or potato masher
- A knife for chopping toppings
- A cutting board
- A small mixing bowl
- A rubber spatula or spoon for spreading layers
Ingredients for Layered Bean Dip
- One 16-ounce can of refried beans (or one and a half cups homemade)
- One tablespoon of taco seasoning or chili powder
- Two ripe avocados
- One tablespoon of fresh lime juice
- One cup of sour cream
- One cup of salsa (mild or spicy, your choice)
- Two cups of shredded cheddar or Mexican blend cheese
- One cup of diced tomatoes (fresh, drained if juicy)
- One-half cup of diced red onion
- One-quarter cup of fresh cilantro, chopped
- One-quarter cup of sliced black olives
- Salt and pepper to taste
Ingredient Notes and Substitutions
- Refried beans: They form the flavor-packed base layer and provide creaminess. Swap in black bean dip or mashed pinto beans if you prefer a different bean.
- Avocados: Fresh guacamole adds richness and healthy fats. If avocados aren’t ripe or available, use a quality store-bought guacamole in a pinch.
- Sour cream: It provides tanginess and helps balance the rich beans and cheese. Greek yogurt works as a lighter substitute with a thicker texture.
- Salsa: This adds brightness and acidity. Use your favorite brand or make fresh pico de gallo if you want more texture.
- Cheddar cheese: Sharp cheddar gives bold flavor while mild cheddar stays subtle. Monterey Jack or a Mexican blend works equally well.
- Fresh toppings: Cilantro and tomatoes brighten the dip, but you can swap in green onions, jalapeños, or radishes for different flavors.
How to Make Layered Bean Dip
Step 1: Prepare the Bean Base Layer
Open your can of refried beans and empty it into a small mixing bowl. Stir in one tablespoon of taco seasoning or chili powder, mixing until the seasoning is evenly distributed throughout the beans.
This step ensures the beans taste flavorful on their own and don’t need to rely solely on the toppings to shine. Taste it quickly and adjust salt if needed before spreading.
Step 2: Spread the Seasoned Beans
Using a rubber spatula, spread the seasoned bean mixture evenly across the bottom of your shallow baking dish. Press down gently to create a smooth, compact layer about one-quarter inch thick.
An even base layer ensures every bite includes beans and prevents them from pushing up through the other layers as people dig in. Take your time here even though it only takes a minute.
Step 3: Prepare the Guacamole Layer
Cut your avocados in half, remove the pit, and scoop the flesh into a small bowl. Mash them with a fork until you reach your desired consistency; I like mine slightly chunky.
Drizzle the lime juice over the mashed avocado immediately and toss gently to combine. The lime juice prevents browning and adds brightness that complements all the other layers perfectly.
Step 4: Spread the Guacamole
Spread the mashed avocado mixture evenly over the bean layer using your spatula. This layer should be roughly one-quarter inch thick, covering the beans completely.
If your guacamole is chunky, that’s fine; just spread it gently to avoid mixing it with the beans underneath. Some texture variation actually makes the dip more interesting to eat.
Step 5: Add the Sour Cream Layer
Spoon the sour cream over the guacamole layer and spread it into an even, thin layer. Use your spatula to gently smooth it out, covering most of the green guacamole.
The sour cream acts as a barrier that keeps the layers distinct and adds a cool, tangy element that balances the richness below. Don’t worry about covering every inch perfectly; some variation is fine.
Step 6: Spread the Salsa Layer
Pour your salsa over the sour cream layer and spread it evenly with a spatula or the back of a spoon. If your salsa is very watery, drain some liquid first to keep the layers from getting soggy.
The salsa brings brightness and heat to the middle of the dip, creating flavor contrast between the creamy layers and the toppings above. This is also where you can adjust heat level by choosing mild or spicy salsa.
Step 7: Add the Cheese Layer
Sprinkle the shredded cheese evenly over the salsa layer, covering it completely. Use about two cups of cheese total, which creates a generous layer without overwhelming the other flavors.
The cheese melts slightly from the warmth of the room and the friction of serving spoons, creating a creamy element that binds all the layers together. It also looks beautiful and signals “this is going to taste amazing” to your guests.
Step 8: Top with Fresh Ingredients
Arrange the diced tomatoes, red onion, black olives, and fresh cilantro on top of the cheese in a decorative pattern or casual scatter, depending on your style. These fresh toppings should cover most of the cheese layer.
The fresh toppings add crunch, color, and bright flavor that complements all the creamy layers below. They also show that you’ve put care into this dip, making it feel special even though it took minutes to assemble.
Pro Tip: Make this dip two to four hours before serving and cover it loosely with plastic wrap; the flavors will meld and taste even better, and you’ll have one less thing to worry about when your guests arrive.
Tips for the Best Layered Bean Dip
- Use a shallow dish rather than a deep bowl so each scoop captures multiple layers. A wide, shallow presentation also makes the dip look more impressive.
- If making ahead, add the fresh tomatoes, cilantro, and onion just before serving so they stay crisp. The other layers taste better when they’ve had time to sit.
- Keep your spreads at room temperature before assembling; cold ingredients are harder to spread evenly and may crack the layers underneath.
- Invest in a good quality salsa you actually enjoy eating, because it’s one of the most prominent flavors in the finished dip. Homemade salsa tastes even better if you have time.
- Don’t skip the lime juice on the avocado; it prevents browning and adds a flavor dimension that makes the whole dip taste brighter and more balanced.
- Serve with sturdy tortilla chips that can handle multiple dips without breaking. Thicker chips prevent the frustrating moment when you scoop and the chip shatters.
Common Mistakes to Avoid
- Overmixing the layers when spreading: This muddles the distinct flavors and ruins the visual appeal. Spread gently and accept some blending at the edges.
- Using underseasoned beans: The beans are the flavor foundation, so season them well before spreading. Taste and adjust before layering.
- Skipping the lime juice on avocado: Browning avocado looks unappetizing and affects taste. Always coat immediately with acid.
- Making the dip too far in advance: While a few hours is ideal, more than six hours causes the layers to blend and toppings to wilt. Time it for two to four hours before your event.
- Using watery salsa without draining: Excess liquid seeps down and makes the layers mushy and soggy. Strain your salsa slightly if it looks runny.
Serving Suggestions
Serve this dip with an array of dippers that give your guests choices and keep everything interesting. A good spread of options also ensures there’s something for every preference and dietary need.
- Warm flour or corn tortilla chips for classic flavor and sturdy scooping.
- Crispy tortilla strips or homemade baked chips for a lighter, crispier option.
- Bell pepper strips, cucumber slices, and celery for fresh, crunchy vegetables.
- Toasted pita chips or whole grain crackers for those wanting something heartier.
- Radish slices for a peppery crunch that cuts through the richness beautifully.
Variations to Try
- Spicy version: Add diced jalapeños to the top layer and use hot salsa and spicy cheese blend for more heat. This transforms the dip into a bold appetizer for spice lovers.
- Black bean variation: Swap the refried beans for black bean dip or mashed black beans mixed with cumin. Black beans have a slightly earthier flavor that pairs beautifully with all the other layers.
- Bacon and green onion: Top the cheese layer with crispy crumbled bacon and sliced green onions instead of cilantro. This adds smokiness and sharpness that appeals to savory dip fans.
- Corn and cotija cheese: Add a thin layer of corn kernels and crumbled cotija cheese instead of or alongside the cheddar. Cotija’s salty tanginess brings a different dimension to the dip.
- Southwestern style: Mix black olives, corn, and diced roasted red peppers into the salsa layer for more texture and flavor complexity. This version feels more like a complete dish than a simple dip.
Dietary Adaptations
- Gluten-free: This recipe is naturally gluten-free as written; just serve it with gluten-free tortilla chips and verify your salsa brand has no gluten additives. The trade-off is checking labels, but the dip itself requires no changes.
- Dairy-free: Substitute vegan sour cream and dairy-free cheese for their traditional counterparts. The flavors shift slightly toward brighter, less rich, but the dip still tastes delicious and satisfying.
- Vegan: Use dairy-free sour cream, nutritional yeast mixed with cornstarch for “cheese,” and ensure your refried beans contain no lard. This version is heartier and less rich but still genuinely enjoyable.
- Low-carb or keto: Replace chips with cucumber slices, celery, bell pepper, and pork rinds for dipping. The dip itself is relatively low-carb and high-fat, making it keto-friendly as written.
Storage and Reheating
Refrigerator
Cover your leftover dip loosely with plastic wrap and store it in the refrigerator for up to three days. The layers may blend slightly, but the flavor actually improves as everything melds together.
- Transfer to an airtight container if storing for longer than one day.
- The fresh toppings may wilt; consider adding fresh ones before serving leftovers.
Freezer
You can freeze the dip (without fresh toppings) for up to one month in an airtight container. The texture changes slightly when thawed, becoming less distinct in layers, but flavors remain solid.
- Thaw overnight in the refrigerator before serving.
- Don’t freeze the avocado layer if possible; add fresh guacamole after thawing for better texture.
Reheating
Thawed dip can be warmed gently in a slow cooker on low for thirty minutes to restore some creaminess. Alternatively, serve it cold straight from the fridge, which is actually quite refreshing.
- Don’t microwave, as it heats unevenly and can separate the layers.
- Add fresh toppings after reheating to restore texture and brightness.
Nutrition Information
| Nutrient | Amount |
|---|---|
| Calories | 180 |
| Total Fat | 12 grams |
| Saturated Fat | 5 grams |
| Carbohydrates | 14 grams |
| Fiber | 3 grams |
| Sugar | 2 grams |
| Protein | 7 grams |
| Sodium | 480 milligrams |
| Cholesterol | 15 milligrams |
Nutrition values are approximate and based on standard ingredient brands. Actual values vary depending on specific products and portion sizes used.
Frequently Asked Questions
Can I use fresh beans instead of canned?
Absolutely; cook and mash dried or fresh beans until creamy, then mix with seasoning just like canned. Fresh beans taste slightly earthier but work beautifully in this recipe.
How far ahead can I make this dip?
Make it up to four hours before serving for best results, keeping it covered at room temperature or in the fridge. The layers taste better when they’ve had time to meld, and the dip stays fresh and crisp.
What if I don’t have sour cream?
Greek yogurt, Mexican crema, or even a layer of softened cream cheese works as a replacement. Each option adds slightly different flavor and texture, but all keep the layered concept intact.
Can I heat this dip in the oven?
Yes, transfer it to a baking dish and bake at three hundred fifty degrees for fifteen to twenty minutes until heated through and the cheese melts. The layers will blend more when warm, but it’s delicious served that way too.
What chips work best for scooping?
Thick, sturdy tortilla chips hold up best when scooping multiple layers without breaking. White corn chips, blue corn chips, and multigrain chips are all excellent choices that won’t leave you with chip fragments in your dip.
Is this recipe actually vegan-friendly?
The traditional recipe is not, but swapping dairy products for their vegan counterparts makes it completely plant-based. The flavors shift slightly, but it remains a satisfying and delicious dip.
Final Thoughts
This layered bean dip represents everything I love about entertaining: simple ingredients, minimal effort, maximum impression. The fact that you can make it hours ahead and still have a stunning appetizer speaks volumes about its reliability.
Next time you’re hosting or bringing a dish to share, give this recipe a try and watch your guests’ faces light up. Once you master the basic layers, you’ll be confident riffing on it with your own favorite flavors, which is honestly
Layered Bean Dip
Ingredients
Equipment
Method
- Open your can of refried beans and empty it into a small mixing bowl.
- Stir in one tablespoon of taco seasoning or chili powder, mixing until the seasoning is evenly distributed throughout the beans.
- Taste the beans and adjust salt if needed before spreading.
- Using a rubber spatula, spread the seasoned bean mixture evenly across the bottom of your shallow baking dish.
- Press down gently to create a smooth, compact layer about one-quarter inch thick.
- Cut your avocados in half, remove the pit, and scoop the flesh into a small bowl.
- Mash the avocado with a fork until slightly chunky.
- Drizzle the lime juice over the mashed avocado immediately and toss gently to combine.
- Spread the mashed avocado mixture evenly over the bean layer using your spatula, about one-quarter inch thick.
- Spoon the sour cream over the guacamole layer and spread it into an even, thin layer.
- Pour your salsa over the sour cream layer and spread it evenly with a spatula or the back of a spoon.
- If your salsa is watery, drain some liquid first to keep the layers from getting soggy.
- Sprinkle the shredded cheese evenly over the salsa layer, covering it completely with about two cups of cheese.
- Arrange the diced tomatoes, red onion, black olives, and fresh cilantro on top of the cheese in a decorative or casual scatter.
- Make this dip two to four hours before serving and cover it loosely with plastic wrap for best flavor melding.