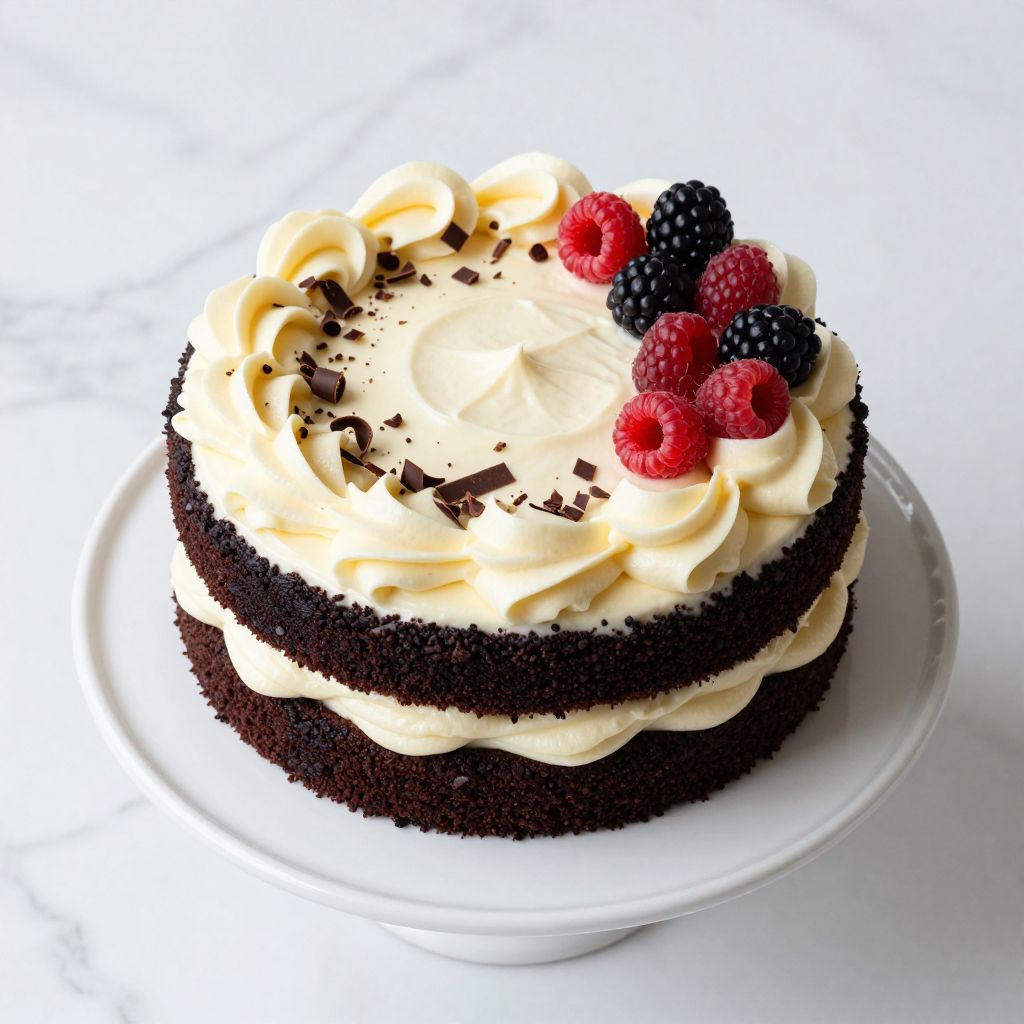
Black Velvet Cake is a stunning dessert that combines the richness of chocolate with the subtle tang of buttermilk and a hint of cocoa depth. This elegant cake features a dark, luxurious crumb that feels almost velvety on the tongue, paired with a silky cream cheese frosting that balances every bite. If you’ve ever wondered how to create a showstopping cake that looks as impressive as it tastes, this recipe delivers.
The magic of this cake lies in its simple ingredients and the careful technique that brings them together. You’ll love how the cocoa powder and a touch of coffee enhance the chocolate flavor without overwhelming the delicate crumb structure. Let’s explore how to master this timeless classic in your own kitchen.
Why You’ll Love This Recipe
This cake strikes the perfect balance between decadent and approachable. You don’t need fancy equipment or hard-to-find ingredients to pull off something truly restaurant-worthy.
- The velvety crumb stays moist for days thanks to the buttermilk and oil in the batter.
- Cream cheese frosting cuts through the richness and adds tangy brightness to every bite.
- The recipe scales beautifully for single-layer cakes or tiered showstoppers.
- It’s naturally impressive enough for special occasions but simple enough for weeknight baking.
- The chocolate flavor develops beautifully without tasting overly bitter or artificial.
My Experience Making This Recipe
The first time I made a black velvet cake, I was genuinely surprised by how dark and elegant it looked straight from the oven. The kitchen filled with a rich, inviting chocolate aroma that had everyone asking what I was baking before they even saw the layers.
I’ll admit, I initially worried the cake would be too dense or heavy, but the crumb turned out surprisingly tender and fine. The cream cheese frosting made everything sing, and watching people’s faces light up when they tasted it made all the mixing worthwhile.
What really sold me was how forgiving this recipe is. I’ve made it with slightly different pan sizes, baked it a few minutes longer on accident, and it still came out beautiful every single time. That reliability is worth its weight in gold when you’re baking for people you want to impress.
Recipe Overview
- Recipe Name: Black Velvet Cake
- Servings: 12
- Prep Time: 20 minutes
- Cook Time: 35 minutes
- Total Time: 55 minutes (plus cooling and frosting)
- Course: Dessert
- Cuisine: American
- Calories per Serving: 385
Equipment You Will Need
- Two 9-inch round cake pans
- Parchment paper
- Measuring cups and spoons
- Large mixing bowl
- Medium mixing bowl
- Electric mixer or whisk
- Spatula or wooden spoon
- Sifter or fine-mesh strainer
- Toothpick for testing doneness
- Wire cooling racks
- Offset spatula for frosting
- Cake turntable (optional but helpful)
Ingredients for Black Velvet Cake
For the Cake
- 2 cups all-purpose flour
- 1 3/4 cups granulated sugar
- 3/4 cup unsweetened cocoa powder
- 2 teaspoons baking soda
- 1 teaspoon baking powder
- 1 teaspoon salt
- 2 large eggs
- 1 cup buttermilk
- 1/2 cup vegetable oil
- 2 teaspoons vanilla extract
- 1 cup strong brewed coffee (or hot water)
- 1 teaspoon instant coffee powder
For the Cream Cheese Frosting
- 8 ounces cream cheese, softened
- 1/2 cup unsalted butter, softened
- 3 cups powdered sugar
- 1 teaspoon vanilla extract
- Pinch of salt
Ingredient Notes and Substitutions
- Cocoa powder: Dutch-process cocoa gives deeper, smoother flavor than natural cocoa. If you only have natural cocoa, reduce the baking soda slightly and add a pinch more salt to balance the acidity.
- Buttermilk: This creates the tender crumb and slight tang that makes the cake special. Substitute by mixing 1 cup milk with 1 tablespoon lemon juice or vinegar, letting it sit 5 minutes before using.
- Vegetable oil: Oil keeps the cake moist longer than butter alone. You can use canola or any neutral oil, but avoid olive oil as it creates an off flavor.
- Coffee: Coffee deepens chocolate flavor without making the cake taste like coffee. Hot water works in a pinch, but you’ll lose some depth and richness in the final crumb.
- Cream cheese: Always use full-fat cream cheese at room temperature for smooth frosting. Whipped or lowered-fat versions won’t whip properly and create a grainy texture.
How to Make Black Velvet Cake
Step 1: Prepare Your Pans
Preheat your oven to 350 degrees Fahrenheit. Lightly grease two 9-inch round pans with butter or baking spray, then line the bottoms with parchment paper to guarantee easy removal.
The parchment paper prevents sticking and helps the layers come out level and intact. This small step saves countless headaches later when you’re trying to frost.
Step 2: Sift the Dry Ingredients
In a large bowl, sift together flour, cocoa powder, sugar, baking soda, baking powder, and salt. Sifting removes lumps from the cocoa and incorporates air, which helps the cake rise evenly.
Make sure to sift directly into the mixing bowl. Lumpy cocoa powder creates dark spots in the finished cake and uneven chocolate distribution.
Step 3: Combine the Wet Ingredients
In a separate medium bowl, whisk together eggs, buttermilk, oil, and vanilla extract until smooth. The mixture should look pale and slightly frothy, which means the eggs are well incorporated.
Don’t skip the whisking step here. Fully combining the wet ingredients ensures even distribution throughout the batter and prevents dense pockets in the cake.
Step 4: Bloom the Coffee
Stir the instant coffee powder into the hot brewed coffee until completely dissolved. This step concentrates the coffee flavor so it enhances rather than dilutes the chocolate taste.
If you skip blooming the instant coffee, it stays gritty and creates a grainy texture in the final cake. The hot liquid also wakes up the coffee compounds, making them more effective.
Step 5: Combine Wet and Dry Ingredients
Pour the wet ingredients into the dry ingredients and stir gently with a spatula just until combined. The batter should look thick but pourable, with no streaks of flour visible.
Overmixing develops gluten, which toughens the cake and creates a dense crumb. Stop stirring as soon as everything looks unified, even if there are a few tiny specks.
Step 6: Add the Coffee and Mix
Pour the coffee mixture into the batter and stir until just incorporated. The batter will look thin and glossy, which is exactly what you want.
The coffee creates steam during baking that helps the cake rise and keeps it moist. The thin batter distributes heat evenly, resulting in a level, evenly baked cake.
Step 7: Divide and Bake
Divide the batter evenly between the prepared pans. Place both pans in the preheated oven on the middle rack, making sure they don’t touch the sides of the oven.
Equal batter distribution ensures both layers bake at the same rate and rise evenly. Bake for 32 to 37 minutes, until a toothpick inserted in the center comes out with just a few moist crumbs.
Step 8: Cool the Cake Layers
Remove the pans from the oven and let them cool in the pans for 10 minutes. The cake needs time to set and pull away from the sides slightly, making removal safer.
Turn the cakes out onto wire cooling racks and peel away the parchment paper. Cool completely to room temperature, about 1 hour, before frosting.
Step 9: Make the Cream Cheese Frosting
Beat softened cream cheese and butter together on medium speed until light and fluffy, about 2 minutes. Scrape down the bowl frequently to ensure everything blends smoothly.
The fluffy texture is crucial because it makes the frosting spreadable without being grainy. If the mixture breaks and looks curdled, you’ve likely overbeaten it or your ingredients were too warm.
Step 10: Add Sugar and Flavorings
Gradually add powdered sugar, 1 cup at a time, beating on low speed after each addition. Once all sugar is incorporated, add vanilla and salt, then beat on medium speed for 1 minute until light and fluffy.
Adding sugar gradually prevents a cloud of powder from escaping your mixer. Beating at the end incorporates air, which makes the frosting spreadable and light.
Step 11: Assemble the Cake
Place the first cake layer on a serving plate or cake turntable. Spread a generous layer of frosting on top, leaving about a half-inch gap from the edge.
The gap allows frosting to spread slightly when you place the top layer, creating an even crumb coat. Place the second layer on top and press gently to adhere it.
Step 12: Frost the Entire Cake
Spread remaining frosting over the top and sides of the cake with an offset spatula. Work slowly and use a turntable if you have one, rotating as you frost for even coverage.
Create swirls and patterns if you like, or keep it smooth and elegant. The frosting firms up slightly as it sits, so work relatively quickly but don’t rush.
Pro Tip: Chill the frosted cake for at least 2 hours or overnight before serving. The cold firms up the frosting, makes slicing cleaner, and actually improves the flavor as the layers meld together.
Tips for the Best Black Velvet Cake
- Use Dutch-process cocoa powder for the deepest, smoothest chocolate flavor. Natural cocoa works, but the cake tastes slightly sharper and less refined.
- Bring all ingredients to room temperature before mixing, especially cream cheese and butter for frosting. Cold ingredients don’t blend smoothly and create lumpy frosting.
- Don’t open the oven door before 30 minutes of baking. The temperature drop causes uneven baking and can create a sunken center.
- Let the cakes cool completely before frosting to prevent the frosting from melting and sliding off. Warm cake is forgiving, but frosting needs a cool surface to set properly.
- Make the frosting while the cakes cool so everything is ready at the same time. This keeps you organized and prevents last-minute rushing.
- If your frosting seems too soft, chill it for 15 minutes before spreading. If it’s too stiff, let it sit at room temperature for 5 minutes and re-beat briefly.
Common Mistakes to Avoid
- Skipping the parchment paper in the pans causes the bottom of the cake to stick, tearing the delicate crumb. This one simple step prevents disasters.
- Overmixing the batter after adding flour creates a tough, dense crumb instead of the tender velvet texture you’re after. Stir just until combined, not until smooth.
- Using cold cream cheese for frosting results in a lumpy, grainy texture that spreads unevenly. Room temperature cream cheese whips smoothly and spreads like silk.
- Baking in dark pans without adjusting temperature causes the edges and bottom to overbake while the center stays underbaked. If using dark pans, reduce oven temperature by 25 degrees.
- Frosting the cake while it’s still warm causes the frosting to melt and slide. Always cool the layers completely first, ideally for at least an hour.
Serving Suggestions
Black Velvet Cake is beautiful on its own, but pairing it with simple accompaniments elevates the entire dessert. The richness pairs beautifully with acidic or refreshing flavors that cut through the chocolate.
- Serve with fresh whipped cream and a few fresh raspberries or blackberries for brightness.
- Add a scoop of vanilla bean ice cream to each slice while the cake is still slightly warm from the cake box.
- Pair with a small glass of cold milk or strong coffee to balance the richness.
- Top with chocolate shavings or cocoa powder for extra decadence if you’re feeling fancy.
- Serve alongside fresh fruit salad or a simple lemon sorbet to add a light, refreshing contrast.
Variations to Try
- Mocha Velvet Cake: Increase instant coffee powder to 2 teaspoons and reduce cocoa powder by 2 tablespoons for a more prominent coffee flavor. The coffee becomes more noticeable while the chocolate remains rich and deep.
- Red Velvet Fusion: Add 1 teaspoon of red food coloring to the batter for a striking dark burgundy hue that’s visually stunning. This creates a cake that looks almost purple-black with a hint of warmth.
- Salted Caramel Version: Swap the cream cheese frosting for salted caramel frosting made with butter, brown sugar, and sea salt. The caramel’s sweetness and salt beautifully complement the dark chocolate crumb.
- Chocolate Ganache Topping: Replace frosting with a glossy chocolate ganache made from dark chocolate and cream. Ganache creates a sophisticated, sleek finish that feels more elegant than frosting.
- Triple Layer Cake: Make 1.5 times the batter and bake in three pans for a taller, more dramatic presentation. This version impresses at celebrations and serves more people without needing to double the frosting recipe.
Dietary Adaptations
- Gluten-free: Substitute all-purpose flour with a 1:1 gluten-free flour blend and reduce baking soda to 1.5 teaspoons. The cake may be slightly denser, but the chocolate flavor remains excellent.
- Dairy-free: Use dairy-free milk mixed with vinegar instead of buttermilk, and swap cream cheese frosting for vegan cream cheese frosting or a simple chocolate frosting made with coconut oil. The crumb stays moist, but the frosting loses some tanginess.
- Vegan: Replace eggs with flax eggs (2 tablespoons ground flaxseed mixed with 6 tablespoons water), use dairy-free milk and oil, and make vegan frosting with dairy-free cream cheese. The texture is slightly crumbly but the flavor remains strong and chocolatey.
- Low-carb/Keto: Swap flour for almond flour (use 2.5 cups) and replace sugar with erythritol or monk fruit sweetener. The cake is nuttier and less dense, with a grainier texture but similar flavor.
Storage and Reheating
Refrigerator
Store the frosted cake in an airtight container for up to 4 days. The cake actually improves slightly as flavors meld.
- Always refrigerate because cream cheese frosting contains dairy and softens quickly at room temperature.
- Let slices come to room temperature for 15 minutes before serving for the best texture and flavor.
Freezer
Unfrosted cake layers freeze beautifully for up to 3 months when wrapped tightly. Frosted cake freezes for up to 1 month, though the frosting texture may shift slightly.
- Freeze layers wrapped in plastic wrap, then aluminum foil, to prevent freezer burn.
- Wrap frosted cake on a plate, then transfer to an airtight container once frozen solid.
Reheating
Thaw frozen cake layers at room temperature for 2 hours, then frost and serve. A frosted cake thaws in the refrigerator overnight, giving you fresh-tasting cake without any effort.
- Never microwave frosted cake as the frosting melts unevenly.
- Room temperature unfrosted layers taste best and frost more easily than cold layers.
Nutrition Information
| Nutrient | Amount |
|---|---|
| Calories | 385 |
| Total Fat | 18g |
| Saturated Fat | 9g |
| Carbohydrates | 52g |
| Fiber | 2g |
| Sugar | 45g |
| Protein | 6g |
Black Velvet Cake
Ingredients
Equipment
Method
- Preheat your oven to 350 degrees Fahrenheit. Lightly grease two 9-inch round pans with butter or baking spray, then line the bottoms with parchment paper for easy removal.
- In a large bowl, sift together the flour, cocoa powder, sugar, baking soda, baking powder, and salt until well combined and lump-free.
- In a medium bowl, whisk the eggs, buttermilk, vegetable oil, and vanilla extract together until smooth and slightly frothy.
- Stir the instant coffee powder into the hot brewed coffee until completely dissolved to bloom the coffee flavor.
- Pour the wet ingredients into the dry ingredients and gently stir with a spatula just until combined, avoiding overmixing.
- Add the coffee mixture to the batter and stir until just incorporated; the batter will be thin and glossy.
- Divide the batter evenly between the prepared pans and bake on the middle rack for 32 to 37 minutes, or until a toothpick inserted in the center comes out with a few moist crumbs.
- Allow the cakes to cool in the pans for 10 minutes, then remove from pans onto wire racks, peel off parchment paper, and cool completely to room temperature (about 1 hour).
- Beat the softened cream cheese and unsalted butter together on medium speed until light and fluffy, approximately 2 minutes.
- Gradually add powdered sugar, 1 cup at a time, beating on low speed after each addition. Add vanilla extract and a pinch of salt, then beat on medium speed for an additional 1 minute until fluffy.
- Place one cake layer on your serving plate or turntable. Spread a generous layer of frosting over the top, leaving about a half-inch gap from the edges.
- Top with the second cake layer, pressing gently to adhere. Spread the remaining frosting over the top and sides evenly using an offset spatula.
- Optionally create swirls or patterns with the frosting. Chill the frosted cake for at least 2 hours or overnight before serving for best flavor and clean slices.