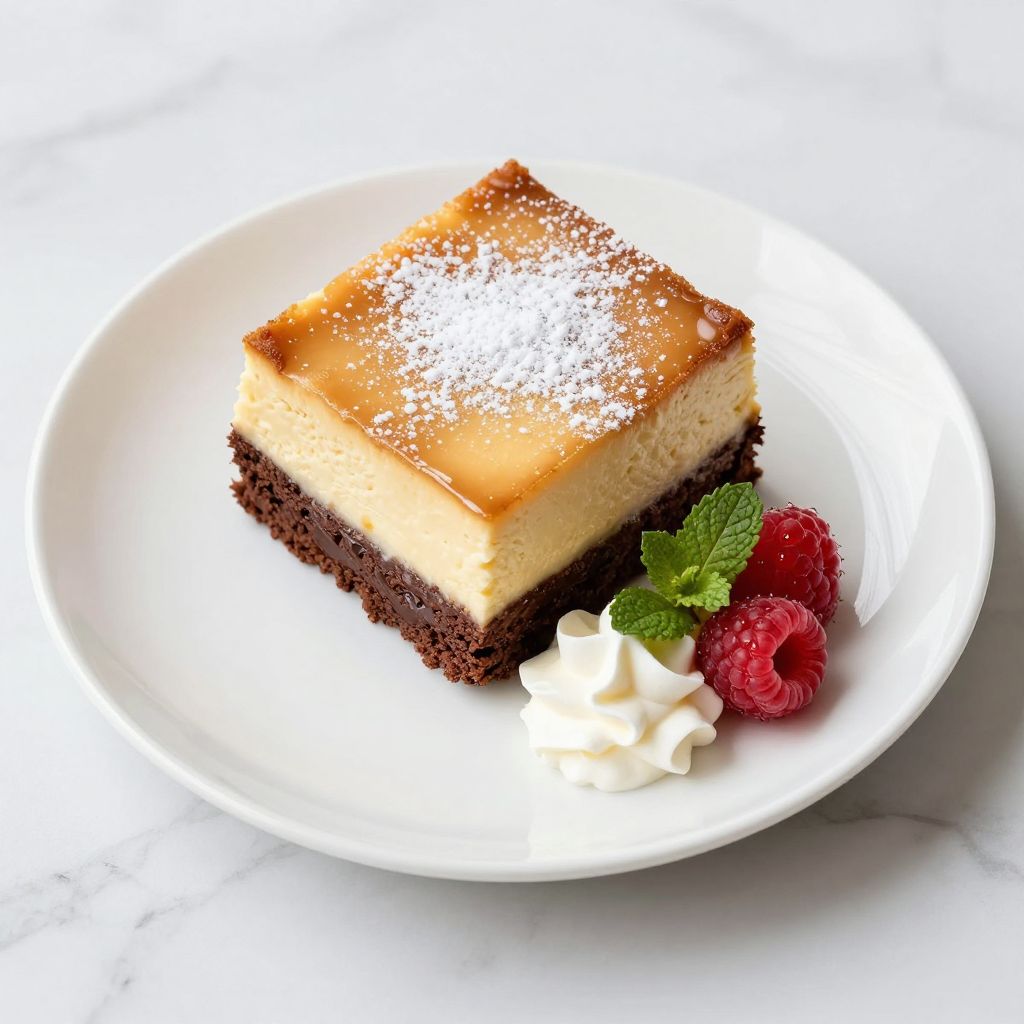
Magic cake is a French dessert that creates three distinct layers while baking in a single batter. The bottom becomes a fudgy brownie layer, the middle transforms into a creamy custard, and the top rises into a light sponge cake, all from one simple mix.
This recipe feels like a kitchen trick, but it’s actually pure science in action. The separation happens naturally as the batter bakes, giving you three textures and flavors in one elegant slice.
Why You’ll Love This Recipe
Magic cake delivers restaurant-quality results with minimal effort and impressive visual impact. Your guests will be stunned when you cut into it and reveal those three hidden layers.
- Three distinct textures in one dessert without any assembly required
- Simple ingredient list with pantry staples you likely already have
- Impressive presentation that looks way fancier than the effort involved
- Perfect for dinner parties, special occasions, or when you want to impress yourself
- Surprisingly forgiving and difficult to mess up once you understand the technique
My Experience Making This Recipe
The first time I made magic cake, I was genuinely skeptical that one batter could separate into three layers. I followed the instructions carefully, poured the mixture into the pan, and watched through the oven window as something magical actually happened.
When I pulled it from the oven, the cake looked slightly underbaked on top, which threw me off. The instructions said to let it cool completely, so I waited, feeling uneasy about the jiggly center.
Cutting into the cooled cake revealed pure magic: a crispy sponge cake layer on top, a silky custard layer in the middle, and a dense, fudgy brownie on the bottom. My dinner guests asked me repeatedly how I separated the layers while baking, and I loved being able to say it just happened naturally.
Recipe Overview
- Recipe Name: Magic Cake
- Servings: 8 servings
- Prep Time: 15 minutes
- Cook Time: 35 minutes
- Total Time: 50 minutes (plus cooling)
- Course: Dessert
- Cuisine: French
- Calories per Serving: 285
Equipment You Will Need
- 8×8 inch square baking pan
- Parchment paper
- Large mixing bowl
- Medium mixing bowl
- Whisk
- Electric mixer or hand mixer
- Measuring cups and spoons
- Spatula
- Water bath (roasting pan with hot water)
- Knife for cutting
Ingredients for Magic Cake
- 4 ounces unsalted butter, softened
- 3/4 cup granulated sugar
- 4 large eggs, separated into yolks and whites
- 1/3 cup all-purpose flour
- 1/4 cup unsweetened cocoa powder
- 1/2 teaspoon vanilla extract
- 1/4 teaspoon salt
- 1 1/4 cups whole milk, room temperature
Ingredient Notes and Substitutions
- Unsalted butter: Provides a clean base without added salt that could throw off the balance of sweetness. Salted butter will work but reduce the salt slightly to avoid over-salting.
- Granulated sugar: Creates the sweetness and helps create the custard layer through the chemical reaction with eggs and milk. Brown sugar will work but adds deeper molasses notes that change the flavor profile.
- Egg yolks and whites separated: The yolks create richness in the custard while whipped whites create the airy sponge top. You cannot skip this separation; it’s essential to the magic.
- All-purpose flour: Provides structure to the sponge layer without being too heavy. Cake flour will make it lighter but may affect the custard layer consistency.
- Unsweetened cocoa powder: Adds the chocolate flavor to all three layers without added sugar or fat. Dutch-process cocoa will work but gives deeper, earthier notes instead of bright chocolate flavor.
- Whole milk: Creates the custard layer and keeps it creamy. Any milk percentage works, but whole milk gives the richest result and lower fat milk makes a thinner custard.
How to Make Magic Cake
Step 1: Prepare Your Pan and Preheat
Preheat your oven to 325 degrees Fahrenheit. Line an 8×8 inch square baking pan with parchment paper, letting it hang over the edges for easy removal later.
This temperature is lower than standard cake baking because you want gentle, even cooking that allows the layers to separate properly. Too hot and the top will brown before the magic happens inside.
Step 2: Separate Your Eggs
Carefully separate your four eggs into yolks and whites, keeping them in two different bowls. Even a tiny speck of yolk in the whites will prevent them from whipping properly, so take your time here.
This step is non-negotiable for magic cake. The separation between yolks and whites is what allows the three layers to form as the egg yolks sink and create the custard while the whites rise and create the sponge.
Step 3: Cream Butter and Sugar
In a large bowl, beat the softened butter with three-quarters cup of sugar using an electric mixer until light and fluffy, about 3 minutes. The mixture should look pale and creamy, almost like frosting.
This creaming process incorporates air into the butter, which contributes to the sponge layer later. Don’t skip this step or rush it; the texture really matters for the final result.
Step 4: Add Egg Yolks and Mix
Add the four egg yolks one at a time to your butter mixture, beating well after each addition. Make sure everything is fully combined and smooth before moving forward.
The yolks add richness and help create that custard layer that makes magic cake so special. This is where a lot of the flavor lives, so don’t be shy about mixing thoroughly.
Step 5: Mix in Dry Ingredients
Sift the flour and cocoa powder together into a small bowl, then add this mixture to your wet ingredients along with the vanilla extract and salt. Fold gently with a spatula until just combined, being careful not to overmix.
Overmixing at this stage develops gluten and makes the cake tough, which ruins the delicate sponge layer. A few lumps are totally fine; they’ll disappear during baking.
Step 6: Heat Your Milk
Heat the milk in the microwave or on the stovetop until it’s warm but not hot, about 110 degrees Fahrenheit. This takes about 30 to 60 seconds in the microwave.
Warm milk incorporates more smoothly into the batter and helps create that custard layer. If the milk is cold, it can cause the batter to seize and separate in the wrong way.
Step 7: Whip Your Egg Whites
In a separate bowl, whip the four egg whites with an electric mixer until stiff peaks form, about 4 to 5 minutes. The mixture should look glossy, white, and hold its shape when you lift the beaters.
These whipped whites are what create the magical sponge layer on top. They need to be whipped to full stiff peak stage, not just soft peaks, or the cake won’t rise properly.
Step 8: Combine Everything
Gently stir the warm milk into your batter until combined, then carefully fold in the whipped egg whites in two batches using a spatula. Use a light hand to preserve all that airy goodness you just created.
This is the moment where your batter goes from looking normal to looking slightly too thin and wet. This is exactly right; don’t panic if it looks like soup.
Step 9: Bake in a Water Bath
Pour the batter into your prepared pan and set it in a larger roasting pan. Pour hot water into the outer pan until it reaches halfway up the sides of the baking pan, creating a water bath.
The water bath ensures even, gentle cooking that lets the magic happen. Bake for 35 to 40 minutes, until the top is golden and springs back when lightly touched, but the center still jiggles slightly when you shake the pan.
Step 10: Cool Completely
Remove the cake from the oven and water bath, then let it cool to room temperature on a wire rack. This takes about one hour, but resist the urge to refrigerate it faster.
The cooling process is when the layers really set and separate. Rushing this by chilling in the fridge can create a dense, rubbery texture instead of the silky custard you’re after.
Pro Tip: The cake will look underbaked and jiggly when it comes out of the oven, which is exactly correct. Overbaking ruins the magic by drying out the custard layer, so trust the process and let it cool completely before judging it.
Tips for the Best Magic Cake
- Use room temperature eggs and milk. Cold ingredients don’t combine as smoothly, and the chemistry that creates the layers depends on proper temperature for the reactions to happen.
- Don’t open the oven door before 30 minutes has passed. The temperature fluctuation can prevent the layers from setting properly and might cause the cake to collapse.
- Make sure your baking pan is exactly 8×8 inches. A larger pan spreads the batter too thin and prevents proper layer formation, while a smaller pan makes it too dense.
- Let the cake sit overnight in the refrigerator before serving if you have time. The flavors meld and develop further, and the layers become even more distinct and easier to cut cleanly.
- Dust with powdered sugar or cocoa powder just before serving for a professional look. This simple addition makes the cake feel extra special without requiring any real skill.
- Serve at room temperature or slightly chilled. Cold cake straight from the fridge is too firm and loses the silky texture of the custard layer.
Common Mistakes to Avoid
- Skipping the egg separation or mixing a tiny bit of yolk into the whites. Even a speck of yolk prevents the whites from whipping properly, and you lose the airy sponge layer that makes this cake special.
- Baking at too high a temperature or for too long. The cake looks underbaked when done, and overbaking dries out the custard layer to the point where it becomes cake instead of silky custard.
- Using cold milk or eggs that haven’t had time to come to room temperature. Cold ingredients don’t mix smoothly and the chemical reaction that creates the layers doesn’t happen the same way.
- Chilling the cake immediately after baking to speed up cooling. Fast chilling sets the layers unevenly and creates a dense, rubbery texture instead of the delicate layers you’re trying to achieve.
- Overmixing after adding the flour or egg whites. This develops gluten and deflates the whipped whites, resulting in a dense cake with poor layer separation.
Serving Suggestions
Magic cake is elegant enough to serve on its own, but it also pairs beautifully with other components. The chocolate and custard flavors work with both light and rich accompaniments.
- Fresh whipped cream on the side lets each person control how much richness they want with each bite
- Fresh berries like raspberries or strawberries add brightness and cut through the richness beautifully
- A scoop of vanilla or coffee ice cream melts into the warm cake and creates a sundae-like experience
- Espresso or strong black coffee alongside plays up the chocolate notes and balances the sweetness
- Salted caramel drizzle adds a sophisticated sweet-salty contrast that elevates the whole presentation
Variations to Try
- Orange Magic Cake: Add two teaspoons of orange zest to the batter and one teaspoon of orange extract instead of vanilla. The citrus brightens the chocolate and adds complexity to all three layers.
- Mocha Magic Cake: Replace one tablespoon of the cocoa powder with instant espresso powder. This deepens the chocolate flavor and adds subtle coffee notes that enhance the richness.
- White Magic Cake: Omit the cocoa powder entirely and increase the flour to one half cup, then add one teaspoon of almond or coconut extract. You get the same three layers with a lighter, more delicate flavor profile.
- Double Chocolate Magic Cake: Add two ounces of melted dark chocolate to the egg yolk mixture and increase the cocoa powder to one third cup. This creates even deeper chocolate flavor throughout all three layers.
- Liqueur Magic Cake: Replace two tablespoons of the milk with a liqueur like Kahlua, Grand Marnier, or Frangelico. The alcohol cooks off but leaves behind sophisticated flavor without affecting the layer formation.
Dietary Adaptations
- Gluten-Free: Replace all-purpose flour with a gluten-free blend and add one quarter teaspoon of xanthan gum. The cake will be slightly denser and the layers less distinct, but still magical.
- Dairy-Free: Use dairy-free milk and butter substitute in equal amounts, though the custard layer becomes thinner and less silky. The result is still delicious but loses some of the original texture magic.
- Vegan: This adaptation is not recommended because magic cake depends on eggs to create the layers. The chemical reactions that make this dessert work require whole eggs, yolks, and whipped whites.
- Low-Carb or Keto: Replace sugar with erythritol or monk fruit sweetener in equal amounts, and use almond flour for half the all-purpose flour. The layers form but the texture becomes more cake-like and less custard-like.
Storage and Reheating
Refrigerator
Store the cooled cake covered with plastic wrap in the refrigerator for up to five days. The layers stay distinct and the flavors continue to develop.
- Wrap tightly to prevent the cake from absorbing odors from other foods
- Let it come to room temperature for 20 minutes before serving for the best texture
- The custard layer may firm up slightly when cold, which is fine and actually makes cutting easier
Freezer
Wrap the cooled cake tightly in plastic wrap and then foil, then freeze for up to three months. The layers remain distinct after thawing.
- Thaw overnight in the refrigerator, then let come to room temperature before serving
- Do not thaw at room temperature, as condensation forms and makes the cake soggy
- Freeze individual slices wrapped separately for easy portion control
Reheating
Gently warm individual slices in a 275 degree Fahrenheit oven for five to ten minutes if you want to serve it warm. Microwaving makes the layers too soft and removes the distinct texture separation.
- Cover with foil while reheating to prevent the top from drying out
- Warm just until the cake is no longer cold to the touch, not hot
- Room temperature is actually the preferred serving temperature since it shows off each layer best
Nutrition Information
| Nutrient | Amount |
|---|---|
| Calories | 285 |
| Total Fat | 14 g |
| Saturated Fat | 8 g |
| Carbohydrates | 35 g |
| Fiber | 1 g |
| Sugar | 28 g |
| Protein | 5 g |
| Sodium | 95 mg |
| Cholesterol | 98 mg |
These values are estimates based on the ingredients listed and assume eight equal servings. Actual nutrition varies based on specific brands and preparation methods used.
Frequently Asked Questions
Can I make magic cake without a water bath?
A water bath is really important for magic cake because it creates the gentle, even heat needed for the layers to form properly. Baking without one often results in a cake that’s burnt on the bottom and underbaked inside, or a cake where the layers don’t separate as distinctly.
How do I know when the cake is actually done baking?
The top should be golden brown and spring back when lightly touched, but the center will still jiggle slightly when you gently shake the pan. This looks underbaked compared to normal cakes, but it’s exactly right for magic cake magic to happen.
Can I use a 9×9 inch pan instead of 8×8?
A 9×9 inch pan is slightly larger and will spread the batter thinner, which affects how the layers form and bake. The cake may be slightly less dense and the custard layer may be thinner, but it can work if that’s what you have available.
Why is my custard layer too thin or too thick?
This usually happens if the milk was too cold when added to the batter, if the batter was overmixed, or if the oven temperature was off. Make sure to use room temperature milk, fold gently, and verify your oven temperature with an oven thermometer.
Can I make magic cake ahead of time?
Yes
Magic Cake
Ingredients
Equipment
Method
- Preheat your oven to 325 degrees Fahrenheit. Line an 8x8 inch square baking pan with parchment paper, letting it hang over the edges for easy removal later.
- Carefully separate the four eggs into yolks and whites, keeping them in two different bowls.
- In a large bowl, beat the softened butter with 3/4 cup granulated sugar using an electric mixer until light and fluffy, about 3 minutes.
- Add the four egg yolks one at a time to the butter mixture, beating well after each addition until fully combined and smooth.
- Sift the all-purpose flour and unsweetened cocoa powder together into a small bowl.
- Add the sifted flour and cocoa powder mixture to the wet ingredients along with the vanilla extract and salt. Fold gently with a spatula until just combined, being careful not to overmix.
- Heat the whole milk in the microwave or on the stovetop until warm but not hot, about 110 degrees Fahrenheit.
- Gently stir the warm milk into the batter until combined.
- In a separate bowl, whip the four egg whites with an electric mixer until stiff peaks form, about 4 to 5 minutes.
- Carefully fold the whipped egg whites into the batter in two batches using a spatula, preserving the airiness.
- Pour the batter into the prepared pan and place it in a larger roasting pan.
- Pour hot water into the roasting pan until it reaches halfway up the sides of the baking pan, creating a water bath.
- Bake for 35 to 40 minutes until the top is golden and springs back when lightly touched, but the center still jiggles slightly when shaken.
- Remove the cake from the oven and water bath, then let it cool completely to room temperature on a wire rack, about 1 hour.